Exercise 51: Getting Input From A Browser
While it's exciting to see the browser display "Hello World", it's even more exciting to let the user submit text to your application from a form. In this exercise we'll improve our starter web application using forms and storing information about the user into their "session".
How The Web Works
Time for some boring stuff. You need to understand a bit more about how the web works before you can make a form. This description isn't complete, but it's accurate and will help you figure out what might be going wrong with your application. Also, creating forms will be easier if you know what they do.
I'll start with a simple diagram that shows you the different parts of a web request and how the information flows:
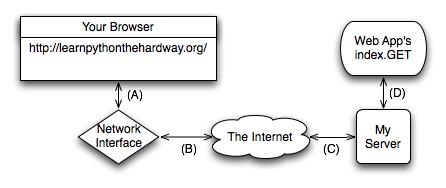
I've labeled the lines with letters so I can walk you through a regular request process:
- You type in the url http://learnpythonthehardway.org/ into your browser and it sends the request out on line (A) to your computer's network interface.
- Your request goes out over the internet on line (B) and then to the remote computer on line (C) where my server accepts the request.
- Once my computer accepts it, my web application gets it on line (D), and my Python code runs the index.GET handler.
- The response comes out of my Python server when I return it, and goes back to your browser over line (D) again.
- The server running this site takes the response off line (D) then sends it back over the internet on line (C).
- The response from the server then comes off the internet on line (B), and your computer's network interface hands it to your browser on line (A).
- Finally, your browser then displays the response.
In this description there are a few terms you should know so that you have a common vocabulary to work with when talking about your web application:
- Browser
- The software that you're probably using every day. Most people don't know what it really does, they just call it "the internet". Its job is to take addresses (like http://learnpythonthehardway.org) you type into the URL bar, then use that information to make requests to the server at that address.
- Address
- This is normally a URL (Uniform Resource Locator) like http://learnpythonthehardway.org/ and indicates where a browser should go. The first part http indicates the protocol you want to use, in this case "Hyper-Text Transport Protocol". You can also try ftp://ibiblio.org/ to see how "File Transport Protocol" works. The learnpythonthehardway.org part is the "hostname", or a human readable address you can remember and which maps to a number called an IP address, similar to a telephone number for a computer on the Internet. Finally, URLs can have a trailing path like the /book/ part of http://learnpythonthehardway.org/book/ which indicates a file or some resource on the server to retrieve with a request. There are many other parts, but those are the main ones.
- Connection
- Once a browser knows what protocol you want to use (http), what server you want to talk to (learnpythonthehardway.org), and what resource on that server to get, it must make a connection. The browser simply asks your Operating System (OS) to open a "port" to the computer, usually port 80. When it works the OS hands back to your program something that works like a file, but is actually sending and receiving bytes over the network wires between your computer and the other computer at "learnpythonthehardway.org". This is also the same thing that happens with http://localhost:8080/ but in this case you're telling the browser to connect to your own computer (localhost) and use port 8080 rather than the default of 80. You could also do http://learnpythonthehardway.org:80/ and get the same result, except you're explicitly saying to use port 80 instead of letting it be that by default.
- Request
- Your browser is connected using the address you gave. Now it needs to ask for the resource it wants (or you want) on the remote server. If you gave /book/ at the end of the URL, then you want the file (resource) at /book/, and most servers will use the real file /book/index.html but pretend it doesn't exist. What the browser does to get this resource is send a request to the server. I won't get into exactly how it does this, but just understand that it has to send something to query the server for the request. The interesting thing is that these "resources" don't have to be files. For instance, when the browser in your application asks for something, the server is returning something your Python code generated.
- Server
- The server is the computer at the end of a browser's connection that knows how to answer your browser's requests for files/resources. Most web servers just send files, and that's actually the majority of traffic. But you're actually building a server in Python that knows how to take requests for resources, and then return strings that you craft using Python. When you do this crafting, you are pretending to be a file to the browser, but really it's just code. As you can see from Ex. 50, it also doesn't take much code to create a response.
- Response
- This is the HTML (css, javascript, or images) your server wants to send back to the browser as the answer to the browser's request. In the case of files, it just reads them off the disk and sends them to the browser, but it wraps the contents of the disk in a special "header" so the browser knows what it's getting. In the case of your application, you're still sending the same thing, including the header, but you generate that data on the fly with your Python code.
That is the fastest crash course in how a web browser accesses information on servers on the internet. It should work well enough for you to understand this exercise, but if not, read about it as much as you can until you get it. A really good way to do that is to take the diagram, and break different parts of the web application you did in Exercise 50. If you can break your web application in predictable ways using the diagram, you'll start to understand how it works.
How Forms Work
The best way to play with forms is to write some code that accepts form data, and then see what you can do. Take your bin/app.py file and make it look like this:
1 2 3 4 5 6 7 8 9 10 11 12 13 14 15 16 17 18 19 20 | import web
urls = (
'/hello', 'Index'
)
app = web.application(urls, globals())
render = web.template.render('templates/')
class Index(object):
def GET(self):
form = web.input(name="Nobody")
greeting = "Hello, %s" % form.name
return render.index(greeting = greeting)
if __name__ == "__main__":
app.run()
|
Restart it (hit CTRL-c and then run it again) to make sure it loads again, then with your browser go to http://localhost:8080/hello which should display, "I just wanted to say Hello, Nobody." Next, change the URL in your browser to http://localhost:8080/hello?name=Frank and you'll see it say "Hello, Frank." Finally, change the name=Frank part to be your name. Now it's saying hello to you.
Let's break down the changes I made to your script.
- Instead of just a string for greeting I'm now using web.input to get data from the browser. This function takes a key=value set of defaults, parses the ?name=Frank part of the URL you give it, and then returns a nice object for you to work with that represents those values.
- I then construct the greeting from the new form.name attribute of the form object, which should be very familiar to you by now.
- Everything else about the file is the same as before.
You're also not restricted to just one parameter on the URL. Change this example to give two variables like this: http://localhost:8080/hello?name=Frank&greet=Hola. Then change the code to get form.name and form.greet like this:
greeting = "%s, %s" % (form.greet, form.name)
After that, try the URL. Next, leave out the &greet=Hola part so that you can see the error you get. Since greet doesn't have a default value in web.input(name="Nobody") then it is a required field. Now go back and make it have a default in the web.input call to see how you fix this. Another thing you can do is set its default to greet=None so that you can check if it exists and then give a better error message, like this:
form = web.input(name="Nobody", greet=None)

if form.greet:
    greeting = "%s, %s" % (form.greet, form.name)
    return render.index(greeting = greeting)
else:
    return "ERROR: greet is required."
Creating HTML Forms
Passing the parameters on the URL works, but it's kind of ugly and not easy to use for regular people. What you really want is a "POST form", which is a special HTML file that has a <form> tag in it. This form will collect information from the user, then send it to your web application just like you did above.
Let's make a quick one so you can see how it works. Here's the new HTML file you need to create, in templates/hello_form.html:
<html>
    <head>
        <title>Sample Web Form</title>
    </head>
<body>

<h1>Fill Out This Form</h1>

<form action="/hello" method="POST">
    A Greeting: <input type="text" name="greet">
    <br/>
    Your Name: <input type="text" name="name">
    <br/>
    <input type="submit">
</form>

</body>
</html>
You should then change bin/app.py to look like this:
1 2 3 4 5 6 7 8 9 10 11 12 13 14 15 16 17 18 19 20 21 | import web
urls = (
'/hello', 'Index'
)
app = web.application(urls, globals())
render = web.template.render('templates/')
class Index(object):
def GET(self):
return render.hello_form()
def POST(self):
form = web.input(name="Nobody", greet="Hello")
greeting = "%s, %s" % (form.greet, form.name)
return render.index(greeting = greeting)
if __name__ == "__main__":
app.run()
|
Once you've got those written up, simply restart the web application again and hit it with your browser like before.
This time you'll get a form asking you for "A Greeting" and "Your Name". When you hit the Submit button on the form, it will give you the same greeting you normally get, but this time look at the URL in your browser. See how it's http://localhost:8080/hello even though you sent in parameters.
The part of the hello_form.html file that makes this work is the line with <form action="/hello" method="POST">. This tells your browser to:
- Collect data from the user using the form fields inside the form.
- Send them to the server using a POST type of request, which is just another browser request that "hides" the form fields.
- Send that to the /hello URL (as shown in the action="/hello" part).
You can then see how the two <input> tags match the names of the variables in your new code. Also notice that instead of just a GET method inside class index, I have another method POST.
How this new application works is:
- The browser first hits the web application at /hello but it sends a GET, so our index.GET function runs and returns the hello_form.
- You fill out the form in the browser, and the browser does what the <form> says and sends the data as a POST.
- The web application then runs the index.POST method rather than the index.GET method to handle this request.
- This index.POST method then does what it normally does to send back the hello page like before. There's really nothing new in here, it's just moved into a new function.
As an exercise, go into the templates/index.html file and add a link back to just /hello so that you can keep filling out the form and seeing the results. Make sure you can explain how this link works and how it's letting you cycle between templates/index.html and templates/hello_form.html and what's being run inside this latest Python code.
Creating A Layout Template
When you work on your game in the next Exercise, you'll need to make a bunch of little HTML pages. Writing a full web page each time will quickly become tedious. Luckily you can create a "layout" template, or a kind of shell that will wrap all your other pages with common headers and footers. Good programmers try to reduce repetition, so layouts are essential for being a good programmer.
Change templates/index.html to be like this:
$def with (greeting)

$if greeting:
    I just wanted to say <em style="color: green; font-size: 2em;">$greeting</em>.
$else:
    <em>Hello</em>, world!
Then change templates/hello_form.html to be like this:
<h1>Fill Out This Form</h1>

<form action="/hello" method="POST">
    A Greeting: <input type="text" name="greet">
    <br/>
    Your Name: <input type="text" name="name">
    <br/>
    <input type="submit">
</form>
All we're doing is stripping out the "boilerplate" at the top and the bottom which is always on every page. We'll put that back into a single templates/layout.html file that handles it for us from now on.
Once you have those changes, create a templates/layout.html file with this in it:
$def with (content)

<html>
<head>
    <title>Gothons From Planet Percal #25</title>
</head>
<body>

$:content

</body>
</html>
This file looks like a regular template, except that it's going to be passed the contents of the other templates and used to wrap them. Anything you put in here doesn't need to be in the other templates. You should also pay attention to how $:content is written, since it's a little different from the other template variables.
The final step is to change the line that makes the render object to be this:
render = web.template.render('templates/', base="layout")
Which tells lpthw.web to use the templates/layout.html file as the base template for all the other templates. Restart your application and then try to change the layout in interesting ways, but without changing the other templates.
Writing Automated Tests For Forms
It's easy to test a web application with your browser by just hitting refresh, but come on, we're programmers here. Why do some repetitive task when we can write some code to test our application? What you're going to do next is write a little test for your web application form based on what you learned in Exercise 47. If you don't remember Exercise 47, read it again.
You need to do a bit of setup to make Python let you load your bin/app.py file for testing. When we get to Exercise 52 you'll change this, but for now create an empty bin/__init__.py file so Python thinks bin/ is a directory.
I've also created a simple little function for lpthw.web that lets you assert things about your web application's response, aptly named assert_response. Create the file tests/tools.py with these contents:
1 2 3 4 5 6 7 8 9 10 11 12 13 14 15 16 17 18 19 | from nose.tools import *
import re
def assert_response(resp, contains=None, matches=None, headers=None, status="200"):
assert status in resp.status, "Expected response %r not in %r" % (status, resp.status)
if status == "200":
assert resp.data, "Response data is empty."
if contains:
assert contains in resp.data, "Response does not contain %r" % contains
if matches:
reg = re.compile(matches)
assert reg.matches(resp.data), "Response does not match %r" % matches
if headers:
assert_equal(resp.headers, headers)
|
Once that's in place you can write your automated test for the last version of the bin/app.py file you created. Create a new file named tests/app_tests.py with this:
1 2 3 4 5 6 7 8 9 10 11 12 13 14 15 16 17 18 19 20 21 22 | from nose.tools import *
from bin.app import app
from tests.tools import assert_response
def test_index():
# check that we get a 404 on the / URL
resp = app.request("/")
assert_response(resp, status="404")
# test our first GET request to /hello
resp = app.request("/hello")
assert_response(resp)
# make sure default values work for the form
resp = app.request("/hello", method="POST")
assert_response(resp, contains="Nobody")
# test that we get expected values
data = {'name': 'Zed', 'greet': 'Hola'}
resp = app.request("/hello", method="POST", data=data)
assert_response(resp, contains="Zed")
|
Finally, use nosetests to run this test setup and test your web application:
$ nosetests
.
----------------------------------------------------------------------
Ran 1 test in 0.059s

OK
What I'm doing here is I'm actually importing the whole application from the bin/app.py module, then running it manually. The lpthw.web framework has a very simple API for processing requests, which looks like this:
app.request(localpart='/', method='GET', data=None, host='0.0.0.0:8080',
            headers=None, https=False)
This means you can pass in the URL as the first parameter, then change the method of the request, as wellas what form data you send, including the host and headers. This works without running an actual web server so you can do tests with automated tests and also use your browser to test a running server.
To validate responses from this function, use the assert_response function from tests.tools which has:
assert_response(resp, contains=None, matches=None, headers=None, status="200")
Pass in the response you get from calling app.request then add things you want checked. Use the contains parameter to make sure that the response contains certain values. Use the status parameter to check for certain responses. There's actually quite a lot of information in this little function so it would be good for you to study it.
In the tests/app_tests.py automated test I'm first making sure the / URL returns a "404 Not Found" response, since it actually doesn't exist. Then I'm checking that /hello works with both a GET and POST form. Following the test should be fairly simple, even if you might not totally know what's going on.
Take some time studying this latest application, especially how the automated testing works. Make sure you understand how I imported the application from bin/app.py and ran it directly for the automated test. This is an important trick that will lead to more learning.
Extra Credit
- Read even more about HTML, and give the simple form a better layout. It helps to draw what you want to do on paper and then implement it with HTML.
- This one is hard, but try to figure out how you'd do a file upload form so that you can upload an image and save it to the disk.
- This is even more mind-numbing, but go find the HTTP RFC (which is the document that describes how HTTP works) and read as much of it as you can. It is really boring, but comes in handy once in a while.
- This will also be really difficult, but see if you can find someone to help you setup a web server like Apache, Nginx, or thttpd. Try to serve a couple of your .html and .css files with it just to see if you can. Don't worry if you can't, web servers kind of suck.
- Take a break after this and just try making as many different web applications as you can. You should definitely read about sessions in web.py (which is the same as lpthw.web) so you can understand how to keep state for a user.