| COMP1406/1006 - Design
and Implementation of Computer Applications |
Winter 2006
|
What's in This Set of Notes ?
Besides stationary graphics, we may also need to display graphics that
change over time. Sometimes the graphics must change on regular
intervals (such as with a timer). We therefore must learn a little
about animation. We will look here at some very basic 2D animation
concepts and what is involved with implementing some simple "motion" aspects
of graphics programming.
Here are the individual topics found in this set of notes (click on one
to go there):
Simply put, computer animation is the term used when
successive images are displayed consecutively to cause the appearance of "motion"
in the image. Unfortunately for us computer science guys n'
gals, all of the hard work in animation is in the drawing of the images,
not displaying. So:
- BAD NEWS: computer animation is intended for the
artistically inclined.
Nevertheless, a person that is "lame" at drawing can still do animation.
Computer animation has become quite popular. Almost all computer
animation that we see these days deals with 3D objects. The objects
are modeled in the computer and then manipulated as wireframes using many
techniques and various physics models. The movements can be quite
complex and much of this requires a knowledge of 3D transformations (i.e.,
translations and rotations) in 3D. After the movement is completed,
then coloring, lighting, shading and texture mapping is all applied.
To complete a single fully rendered frame it can take many minutes depending
on the machine. To make a 5 minute high quality computer animated video
can take many hours to render with a single machine.
We will not deal with 3D animation at all here. We will simply
animate 2D images (a.k.a. sprites) and move them around on
the screen.
|
|
The simplest form of 2D animation in JAVA is the use of animated gif files.
We have seen this type of file with "brain.gif". Unfortunately, animated
gifs are "stuck" in endless loops that do not allow user interaction.
That is, we cannot control the sequence of images and hence the animation
is very basic. We will therefore consider making our own animated
sequences that are under user control.
Frames:
Notice that it looks much smoother. But hey, it seems slower!
This is because in both cases we have introduced a 1/4 second delay between
frames. In the 2-frame situation it takes 1/2 of a second to
complete a cycle while in the 4-frame case, it takes a full second.
We can reduce the inter-frame delay to 1/8 of a second and we will be fine.
This change in time between frame displaying is known as the frame
rate. Here are some varying frame rates:
5/20 sec.

|
4/20 sec.

|
3/20 sec.

|
2/20 sec.

|
1/20 sec.

|
There isn't too much more to say about animation right now.
| 10.2 Simple Animation and Threads |
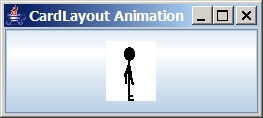
Our first example is to use the CardLayout
manager to display consecutive images one after another. We will place
an ImageIcon on each of 4 buttons and when the button is pressed,
we will cause consecutive images to be displayed by just showing the next
card (i.e., button) in the layout. As long as the pictures represent
consecutive images, we are fine. Here are the images that we will use,
shown in order from 0 to 3:
Frame 0

|
Frame 1

|
Frame 2

|
Frame 3
|
Frame 0 again
|
|
|
import java.awt.*;
import java.awt.event.*;
import javax.swing.*;
public class CardLayoutAnimation
extends JFrame implements ActionListener {
private CardLayout cardLayoutManager;
public CardLayoutAnimation (String title)
{
super(title);
cardLayoutManager = new
CardLayout(0,0);
setLayout(cardLayoutManager);
//
Add the 8 buttons, each with a different picture as the icon
for (int
i=0; i<4; i++) {
JButton aButton = new JButton(new ImageIcon("Stick" + i + ".gif"));
add(String.valueOf(i), aButton);
aButton.addActionListener(this);
}
setDefaultCloseOperation(EXIT_ON_CLOSE);
setSize(80, 120);
}
// Cause a 1/10 second delay
when called
private void delay() {
try {
Thread.sleep(100);
}
catch (InterruptedException
e){ /* do nothing */ }
}
// Implements the listener
behavior, e.g. go to next button in the stack
public void actionPerformed(ActionEvent
theEvent) {
for (int
i=0; i<4; i++) {
cardLayoutManager.next(getContentPane());
// Now redraw the window by updating its appearance
update(getGraphics());
// a standard JComponent method
delay();
}
}
// Create main method to
execute the application
public static void main(String
args[]) {
new CardLayoutAnimation("CardLayout Animation").setVisible(true);
}
}
Notice the use of Thread.sleep(100) to provide a 1/10th second
delay between image flips. Also notice the use of update(getGraphics())
to ensure that the frame is updated after every image change.
This is a standard method available for all JComponents and it usually
simply repaints the component immediately. Why do we need to do this
redraw update for each image ? Remember, while executing code
within an event handler, no other events can be handled, including events
responsible for redrawing components. So we have to explicitly call
this update method in order to see screen changes while we are still in our
event handling code.
What happens if we increase the delay between images ? If
the delay is too long, no events are handled and so the interface seems to
lock up. Let us add another button that prints out a message
when pressed.
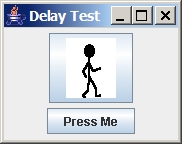
We will increase the delay of the drawing so that this button becomes
unresponsive while the animation is taking place. A similar
kind of delay may occur when we need to do a lot of animating, or perhaps
when the animation steps themselves require a lot of computation.
import java.awt.*;
import java.awt.event.*;
import javax.swing.*;
public class CardLayoutAnimation2
extends JFrame implements ActionListener {
private CardLayout cardLayoutManager;
private JPanel panel;
public CardLayoutAnimation2 (String title)
{
super(title);
setLayout(new
FlowLayout());
// Make a panel to hold the buttons using a card layout manager
cardLayoutManager =
new CardLayout(0,0);
panel = new JPanel();
panel.setLayout(cardLayoutManager);
for (int
i=0; i<4; i++) {
JButton aButton = new JButton(new ImageIcon("Stick" + i + ".gif"));
panel.add(String.valueOf(i), aButton);
aButton.addActionListener(this);
}
// Make another button, then add the panel and this button
to the frame
JButton b = new
JButton("Press Me");
add(panel);
add(b);
// Print a simple message when the button is pressed
b.addActionListener(
new ActionListener() {
public void actionPerformed(ActionEvent theEvent) {
System.out.println("Hello");
}});
setDefaultCloseOperation(EXIT_ON_CLOSE);
setSize(80,160);
}
// Cause a 1 second delay
when called
private void delay() {
try { Thread.sleep(1000);
}
catch (InterruptedException
e){}
}
// implements the listener
behavior, e.g. go to next button in the stack
public void actionPerformed(ActionEvent
theEvent) {
for (int
i=0; i<4; i++) {
cardLayoutManager.next(panel);
update(getGraphics());
delay(); // Now a long delay
}
}
public static void main(String args[])
{
new CardLayoutAnimation2("Animated Title").setVisible(true);
}
}
When the code runs, try pressing the "Press Me" button. It prints
a message. Now try clicking the image button. Notice
that the animation is now slower, since we lengthened the frame rate to
1 second. Try pressing the "Press Me" button a few times during
the animating process. Nothing happens. That is because
the events are being queued, but not handled. Once the animation
stops, you will see that the queued messages are handled all at once.
Try it again, this time try to close the window during the animation.
So ... clearly this is a problem. How can we fix it ?
We need to create a separate thread (i.e., a separate process) to handle
the animation, while the main process handles all other application events.
Generally, whenever you need to have an event handler that is computationally
intensive (i.e., it is slow at what it needs to do), you should make a
separate thread to do it. Let us look at making a separate thread
in our example.
One way to make a separate process for doing our animation is to make
a separate class, which will be a subclass of the Thread class.
We will make one called AnimationThread that will do the animation
on the panel which we specify:
import java.awt.*;
import javax.swing.*;
public class AnimationThread
extends Thread {
private JPanel aPanel;
private CardLayout aLayoutManager;
public AnimationThread(JPanel p, CardLayout
c) {
aPanel = p;
aLayoutManager = c;
}
// Make a brief delay
private void delay() {
try { Thread.sleep(1000);
}
catch (InterruptedException
e){}
}
public void run() {
for (int
i=0; i<4; i++) {
aLayoutManager.next(aPanel);
aPanel.update(aPanel.getGraphics());
delay();
}
}
}
All Threads MUST have a run() method which contains all
the code to be done in the thread. It is kind of like the "main"
method of a JFrame. When it is done executing, the Thread
is done too.
Now, we can change the listener in our CardAnimationExample2 to
be:
public void actionPerformed(ActionEvent theEvent)
{
new AnimationThread(panel, cardLayoutManager).start();
}
Try the code. You will notice now that as the animation is
working, the application still responds to button clicks and window closing
events.
A second way to do all of this would have been NOT to make a separate
class of Thread, but in fact make our application implement the Runnable
interface. We would still write a run() method, but
everything goes into one class:
import java.awt.*;
import java.awt.event.*;
import javax.swing.*;
public class CardLayoutAnimation4
extends JFrame
implements ActionListener, Runnable {
private CardLayout cardLayoutManager;
private JPanel panel;
public CardLayoutAnimation2 (String title)
{
super(title);
setLayout(new
FlowLayout());
// Make a panel to hold the buttons using a card layout manager
cardLayoutManager =
new CardLayout(0,0);
panel = new JPanel();
panel.setLayout(cardLayoutManager);
for (int
i=0; i<4; i++) {
JButton aButton = new JButton(new ImageIcon("Stick" + i + ".gif"));
panel.add(String.valueOf(i), aButton);
aButton.addActionListener(this);
}
// Make another button, then add the panel and this button
to the frame
JButton b = new
JButton("Press Me");
add(panel);
add(b);
// Print a simple message when the button is pressed
b.addActionListener(
new ActionListener() {
public void actionPerformed(ActionEvent theEvent) {
System.out.println("Hello");
}});
setDefaultCloseOperation(EXIT_ON_CLOSE);
setSize(80,160);
}
// Cause a 1 second delay
when called
private void delay() {
try { Thread.sleep(1000);
}
catch (InterruptedException
e){}
}
// Handle the animation
public void run()
{
for (int
i=0; i<4; i++) {
cardLayoutManager.next(panel);
panel.update(panel.getGraphics());
delay();
}
}
// implements the listener
behavior, e.g. go to next button in the stack
public void actionPerformed(ActionEvent
theEvent) {
// Start a new thread using the run() method from this
class
new Thread(this).start();
}
public static void main(String args[])
{
new CardLayoutAnimation2("Animated Title").setVisible(true);
}
}
Often, this is the simplest way to do it :).
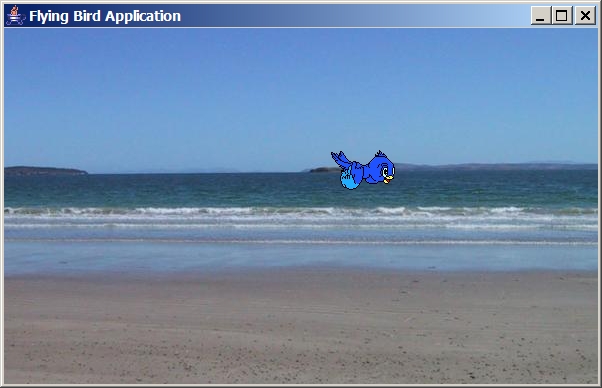
We will now look at kinetic animation, that is ... animation
that moves as opposed to staying in one location. Our task will be
to move a bird around in a window. Here are the frames that we will
use:

These frames are numbered 0 to 7 starting
at the top left and numbering across first.
Getting this bird to fly in a single location on the screen is now easy.
We can use the CardLayout manager if we want to ... however, we
will want to make the bird move around. Our choice will be to display
it on a JFrame or JPanel. We will write the code such
that the user gets to make the bird fly by causing it to flap its wings
whenever he/she clicks the mouse. Notice that our bird will only fly
from left to right.
|
To start, let us consider making a FlyingBird class to represent the
bird.
What information (i.e., instance variables) should we keep for the bird ?
- Point currentLocation;
// the bird's coordinate on the screen
- Image[] images;
// the frames of the bird (we
will have 8)
- int currentFrame;
// the frame currently being displayed
|

|
Here is the start of our code. We will make two class variables
to keep track of how many frames the bird will have and the width of each
frame (in pixels):
public static int NUM_FRAMES
= 8;
public static int WIDTH
= 78;
When making a bird, we must load up the images from the file and store
them into the images array. We probably also want to choose
some starting frame (in our case #4) as well as a starting location.
We will not supply a "get" method for the image array. Instead, we
will write a method called appearance() that will return the image
corresponding to the current frame of the bird. Here is a start to
our code:
import java.awt.*;
import java.awt.event.*;
import javax.swing.*;
public class FlyingBird {
public static int NUM_FRAMES
= 8;
public static int WIDTH
= 78;
// Instance variables
private Point currentLocation;
// the bird's coordinate on the screen
private Image[] images;
// the frames of
the bird (we will have 8)
private int currentFrame;
// the frame currently being displayed
// Default constructor
public FlyingBird() {
currentFrame
= 4;
currentLocation = new
Point(100,100);
images = new
Image[FlyingBird.NUM_FRAMES];
for (int
i=0; i<NUM_FRAMES; i++) {
images[i] = Toolkit.getDefaultToolkit().getImage(
"BIRDX" + (i+1) + ".gif");
}
}
public int getCurrentFrame() {
return currentFrame; }
public Point getCurrentLocation() { return
currentLocation; }
// Return the image representing
the bird's current appearance
public Image appearance() {
return (images[currentFrame]);
}
}
So, each bird will keep track of its current frame,
location and appearance. We will just need to supply some methods
that we can call from the application that will tell the bird to advance
its frame to the next one and move forward as necessary. For some
added realism, we will have the bird "fall" when its wings are not flapping.
That brings up some good questions:
- When is the bird flying and when is it falling ?
- What does it look like when its falling ?
- How do we make it fall ?
These are easily answered.
- The bird is flying when its wings are flapping down and falling
otherwise.
- We will choose frame 3 to represent the "falling" frame.
- We make it fall by increasing the y value of the location.
|
|
Here is the advance() method that moves the bird forward while advancing
the frame and also takes into accout gravity:
// This method allows the
frames to advance as well as move the bird
public void advance() {
//
Move the bird forward 10 pixels
currentLocation.translate(10,0);
//
Make gravity pull the bird down, unless its wings are flapping
if (currentFrame
> 3)
currentLocation.translate(0,-5);
else
currentLocation.translate(0,5);
if (currentFrame
!= 3)
currentFrame = (currentFrame + 1) % 8;
}
We will also want to make the bird flap its wings. To do this, we
can just "jump" to the frame that starts the flapping:
// Set the frame to show
the bird starting to flap its wings
public void flapWings() {
currentFrame = 4;
}
The "follow-through" from the flapping (i.e., the continuation and completion
of the flapping motion) will be handled by successive calls to advance().
Now that we have the bird working, let us get the interface going.
We will make a JFrame and color the background white. We will
set up a Timer that will cause the bird to advance every 1/5 of a
second.
import java.awt.*;
import java.awt.event.*;
import javax.swing.*;
public class FlyingBirdApp extends
JFrame implements ActionListener {
private static int WIDTH
= 600;
private static int HEIGHT
= 400;
private FlyingBird aBird; // model
private Timer aTimer;
private Image background;
public FlyingBirdApp
(String title, FlyingBird theBird) {
super(title);
aBird = theBird;
// We can use nice scenery for the background
background = Toolkit.getDefaultToolkit().getImage("beach.jpg");
// Start the timer so that the bird comes to life
aTimer = new
Timer(100, this);
aTimer.start();
setDefaultCloseOperation(EXIT_ON_CLOSE);
setSize(540, 210);
}
// This is the timer event
handler
public void actionPerformed(ActionEvent
e) {
aBird.advance();
if (aBird.getCurrentLocation().x
> WIDTH)
aBird.getCurrentLocation().x = -1 * FlyingBird.WIDTH;
repaint();
}
public void paint(Graphics g) {
g.drawImage(background,
0, 0, null);
g.drawImage(aBird.appearance(),
aBird.getCurrentLocation().x,
aBird.getCurrentLocation().y, this);
}
// Create main method to
execute the application
public static void main(String
args[]) {
new FlyingBirdApp("Flying Bird", new FlyingBird()).setVisible(true);
}
}
Notice that the Timer event causes the bird to advance and then
repaints the frame. It also checks to see if the bird goes off the
end of the frame and brings it back around to the left side again.
The paint() method merely gets the appearance of the bird (i.e., the
image) and displays it at the bird's current location. Note that we
use paint() instead of paintComponent() since this is a JFrame,
not a JPanel.
Now we just need to add the MousePressed event handler to make
the bird flap its wings:
// Add a MousePressed event
handler
addMouseListener(new MouseAdapter()
{
public void mousePressed(MouseEvent e) {
aBird.flapWings();
}});
Here is the end result of our hard work: