| COMP1406/1006 - Design
and Implementation of Computer Applications |
Winter 2006
|
What's in This Set of Notes?
In most GUI designs, there are often many options and user
preferences. In many cases it is too difficult to place
everything onto one window. For this reason, menus and
dialog boxes are used. Menus allow us to efficiently
group/hide similar options together so that the screen does not become
cluttered. Dialog Boxes allow us to momentarily take the user's
attention away from the main window so as to obtain information or ask
questions
which are required at specific points in the application.
We will
look into both of these "tools" here.
Here are the individual topics found in this set of notes (click on
one to go there):
What is Menu?
- Conceptually, a menu is a list of buttons each of which
have their own corresponding action when selected.
- drop-down (or pull-down)
- usually associated with an application's menubar
- popup - associated with any container
component (i.e., often accessed via right button click)
- cascaded - pops up when another menu item
is selected (i.e. a sub menu)
What are the main Menu Classes?
|
 |
- JMenuBar:
- An object at the top of the frame that contains "pull down"
menus. Tthere can be only one per frame.
- Only the names of the pull down menus are displayed on the
menubar.
- When one of the menu names is selected, the corresponding menu
appears (i.e., pops up).
- JMenu:
- A menu that may contain:
- menu items (called JMenuItems), which the user can
select from (like buttons).
- separator lines (called JSeparators) to divide up
the items into logical groupings.
- other menus (i.e., JMenus) which act as cascading menus.
- The user selects an option and an action is performed (just
like clicking a button).
- It is added to a JMenuBar object by specifying its
name (or label) which will appear on the menubar.
- JMenuItem:
- A button on a menu. When the user selects the "button", the
action associated with the menu item is performed.
- ImageIcons can be used on menus as well by assigning
an icon to a menuItem (just like JButtons).
- There are also JRadioButtonMenuItem:
- A menu item that is part of a group
of menu items in which only one item in the group can be selected.
- JPopupMenu:
- A small window which pops up and displays a menu of choices.
- Used for the menu that appears when the user selects an item on
the menu bar.
- Also used for "pull-right" menus that appear when the user
selects a menu item that activates it.
- A JPopupMenu can also be used anywhere else you want a
menu to appear (e.g., when the user right-clicks in a specified area).
How Does it all "Hook" Together
?
This diagram shows how all these components hook together.
Basically ....
- A single JMenuBar is
added to a JFrame
- Multiple JMenus are
added to the JMenuBar
- JMenuItems and cascaded JMenus are added to other menus
- JPopupMenus are added to JFrames

How do we write the code to get it all hooked up ?
- We need to create and add a JMenuBar
to our JFrame by
doing the following in our JFrame constructor:
- Create an new instance of JMenuBar:
JMenuBar myMenuBar = new
JMenuBar();
- Set the JFrame's menubar to that instance:
myFrame.setJMenuBar(myMenuBar);
- We need to add JMenus to
our menu bar by doing the following in our JFrame constructor:
- Create a new instance of JMenu and give it a label:
JMenu fileMenu = new JMenu("File");
- Add the JMenu to the JMenuBar:
myMenuBar.add(fileMenu);
- Optionally set the keyboard accelerators (i.e., quick keys):
fileMenu.setMnemonic('F');
- We can add JMenuItems and/or
JSeparators to our JMenus, which we can also do in our JFrame
constructor:
- Create an new instance of JMenuItem and/or JSeparator and give it a label:
JMenuItem newItem =
new JMenuItem("New");
JSeparator
sepItem = new JSeparator();
- Add these items to the JMenu:
fileMenu.add(newItem);
fileMenu.add(sepItem);
- Set the keyboard accelerators for the JMenuItems if desired:
//
This could have been done in the constructor: new JMenuItem("New",
'N');
newItem.setMnemonic('N');
- Add an ActionListener to
each JMenuItem:
// they may all
go to the same event handler or to separate ones
newItem.addActionListener(new ActionListener() {
public void
actionPerformed(ActionEvent e) {
//
Handle the selection of this item from the menu
}
});
- We can add JRadioButtonMenuItems
to our JMenus,
which we can also do in our JFrame constructor:
- Create new instances of JRadioButtonMenuItem
and give them labels:
JRadioButtonMenuItem
rbItem1 = new
JRadioButtonMenuItem("Apples");
JRadioButtonMenuItem rbItem2 = new
JRadioButtonMenuItem("Oranges");
JRadioButtonMenuItem rbItem3 = new
JRadioButtonMenuItem("Bananas");
- Add the JRadioButtonMenuItems
to the JMenu:
settingsMenu.add(rbItem1);
settingsMenu.add(rbItem2);
settingsMenu.add(rbItem3);
- Add the JRadioButtonMenuItems
to a ButtonGroup():
ButtonGroup
fruits = new ButtonGroup();
fruits.add(rbItem1);
fruits.add(rbItem2);
fruits.add(rbItem3);
- Add an ActionListener to
each JRadioButtonMenuItem:
// they may all
go to the same event handler (as here), or to separate ones
rbItem1.addActionListener(this);
rbItem2.addActionListener(this);
rbItem3.addActionListener(this);
public void actionPerformed(ActionEvent e) {
// Handle the selection of these
items from the menu
}
- We can add cascading menus simply by adding a JMenu to another JMenu:
- Create an new instance of JMenu and give it a label
JMenu
searchMenu = new
JMenu("Search");
- Add JMenuItems to the new JMenu and set the
keyboard accelerators if desired:
JMenuItem findItem = new JMenuItem("Find");
JMenuItem replaceItem = new JMenuItem("Replace");
searchMenu.add(findItem);
searchMenu.add(replaceItem);
- Add the JMenu to some other JMenu:
fileMenu.add(searchMenu);
- We can add a JPopupMenu to
the JFrame:
- Create a new instance of JPopupMenu and give it a
label:
JPopupMenu popupMenu = new
JPopupMenu();
- Add JMenu and JMenuItems to the new JPopupMenu
and set the keyboard accelerators if desired:
JMenuItem
helpItem = new JMenuItem("help");
JMenuItem inspectItem = new JMenuItem("inspect");
popupMenu.add(helpItem);
popupMenu.add(inspectItem);
- Add a MouseListener to the JFrame and then handle a
mouseReleased() event in which the show() message is sent to
the menu:
myFrame.addMouseListener(new MouseAdapter() {
public
void mouseReleased(MouseEvent e) {
if (event.isPopupTrigger())
popupMenu.show(e.getComponent(),
e.getX(), e.getY());
}
});
We can keep in mind that there are other settings
for our JMenus and MenuItems:
- To set the
Color:
anItem.setBackground(Color.red);
anItem.setForeground(Color.yellow);
- To Enable/Disable various items:
anItem.setEnabled(true);
anItem.setEnabled(false);
Example:
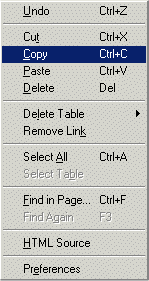
Here is an example in which we investigate the use of a menubar with menus as well as
cascaded menus and a popup menu. The example has no purpose other
than to show you how the different menus are created and
used. Here are screen snapshots that show the menus that we
will
create in this example:

A standard menu
|
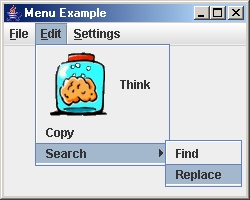
A cascaded menu
|
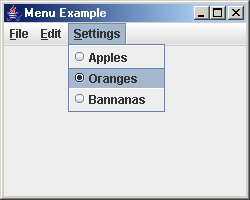
A menu with radio buttons
|
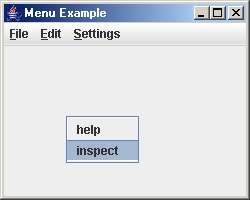
A pop-up menu
|
The example shows how the use of many menu
items can lead to a lot of instance variables. In addition, we
use a common event handler for all menu items and apply a dispatching
strategy which calls
the appropriate react method for the given menu item. We could
have
omitted the react methods and merely placed all this code within the
single
event handler but this could look messy if the react methods are large.
How would the example look if we used
anonymous classes
instead of one event handler ? It may not save much in code size
but
we only need to update the class in one place instead of two when a
menu
item is added or removed! Also, we might not need to keep all the menu
items
in instance variables! Why not give it a try and see what it looks like.
import java.awt.event.*;
import javax.swing.*;
public class MenuExample extends JFrame implements
ActionListener {
// Store menu items and popup
menu for access from event handlers
JMenuItem thinkItem, copyItem, newItem, openItem,
saveAsItem,
findItem, replaceItem, appleItem, orangeItem,
bannanaItem,
helpItem,
inspectItem;
JPopupMenu popupMenu;
public MenuExample(String
title) {
super(title);
// Create the menu bar
JMenuBar menuBar = new
JMenuBar();
setJMenuBar(menuBar);
//
Create and Add the File menu
to the Menu Bar
JMenu fileMenu = new
JMenu("File");
fileMenu.setMnemonic('F');
fileMenu.add(newItem = new JMenuItem("New", 'N'));
fileMenu.add(new JSeparator());
fileMenu.add(openItem = new
JMenuItem("Open", 'O'));
fileMenu.add(saveAsItem = new JMenuItem("Save As"));
menuBar.add(fileMenu); // Don't forget to do this
newItem.addActionListener(this);
openItem.addActionListener(this);
saveAsItem.addActionListener(this);
//
Create and Add the Edit menu
to the Menu Bar
JMenu editMenu = new
JMenu("Edit");
editMenu.setMnemonic('E');
editMenu.add(thinkItem = new
JMenuItem("Think", new ImageIcon("brain.gif")));
editMenu.add(copyItem = new JMenuItem("Copy"));
menuBar.add(editMenu);
thinkItem.addActionListener(this);
copyItem.addActionListener(this);
// Create and Add the Settings menu
to the Menu Bar
JMenu settingsMenu = new
JMenu("Settings");
settingsMenu.setMnemonic('S');
settingsMenu.add(appleItem
= new JRadioButtonMenuItem("Apples"));
settingsMenu.add(orangeItem
= new JRadioButtonMenuItem("Oranges"));
settingsMenu.add(bannanaItem
= new JRadioButtonMenuItem("Bannanas"));
menuBar.add(settingsMenu);
//
Ensure that only one radio button is on at a time
ButtonGroup fruits = new ButtonGroup();
fruits.add(appleItem);
fruits.add(orangeItem);
fruits.add(bannanaItem);
// Create the cascading Search menu
on the Settings menu
JMenu searchMenu = new
JMenu("Search");
searchMenu.add(findItem = new JMenuItem("Find"));
searchMenu.add(replaceItem = new JMenuItem("Replace"));
editMenu.add(searchMenu);
findItem.addActionListener(this);
replaceItem.addActionListener(this);
//
Create and Add items to the popup menu. Notice
// that we do not add
the popup menu to anything.
popupMenu = new JPopupMenu();
popupMenu.add(helpItem = new JMenuItem("help"));
popupMenu.add(inspectItem = new JMenuItem("inspect"));
helpItem.addActionListener(this);
inspectItem.addActionListener(this);
// Register the event handler for
the
popup menu
addMouseListener(new
MouseAdapter() {
public
void mouseReleased(MouseEvent e){
if
(e.isPopupTrigger())
popupMenu.show(e.getComponent(), e.getX(), e.getY());
}
});
setDefaultCloseOperation(EXIT_ON_CLOSE);
setSize(300,
300);
}
// Handle all menu selections and
dispatch to the appripriate helper method accordingly
public void actionPerformed(ActionEvent
e){
if (e.getSource()
== newItem)
reactToNewMenuSelection();
else if (e.getSource() ==
openItem)
reactToOpenMenuSelection();
else if (e.getSource() ==
saveAsItem)
reactToSaveAsMenuSelection();
else if (e.getSource() ==
copyItem)
reactToCopyMenuSelection();
else if (e.getSource() ==
thinkItem)
reactToThinkMenuSelection();
else if (e.getSource() ==
findItem)
reactToFindMenuSelection();
else if (e.getSource() ==
replaceItem)
reactToReplaceMenuSelection();
else if (e.getSource() ==
helpItem)
reactToHelpMenuSelection();
else if (e.getSource() ==
inspectItem)
reactToInspectMenuSelection();
}
// Here are all the helper methods for
handling the
menu choices
public void
reactToNewMenuSelection() {
System.out.println("reacting to NEW selection from menu");
}
public void
reactToOpenMenuSelection() {
System.out.println("reacting to OPEN selection from menu");
}
public void
reactToSaveAsMenuSelection() {
System.out.println("reacting to SAVE AS selection from menu");
}
public void
reactToThinkMenuSelection() {
System.out.println("reacting to THINK selection from menu");
}
public void
reactToCopyMenuSelection() {
System.out.println("reacting to COPY selection from menu");
}
public void
reactToFindMenuSelection() {
System.out.println("reacting to FIND selection from menu");
}
public void
reactToReplaceMenuSelection() {
System.out.println("reacting to REPLACE selection from menu");
}
public void
reactToHelpMenuSelection() {
System.out.println("reacting to HELP selection from popup menu");
}
public void
reactToInspectMenuSelection() {
System.out.println("reacting to INSPECT selection from popup menu");
}
public static void
main(String args[]) {
new
MenuExample("Menu
Example").setVisible(true);
}
}
| 6.2 Standard Dialog Boxes |
A dialog box is:
- a separate window that pops up in response to an event occurring
in a window.
- often used to obtain information from the user (e.g., entering
some values such as when filling out a form).
There are various types of commonly used dialog boxes:
- Message Dialog - displays a message indicating information,
errors, warnings etc...
- Confirmation Dialog - asks a question such as yes/no
- Input Dialog - asks for some kind of input
- Option Dialog - asks the user to select some option
JAVA has a class called JOptionPane that can bring up one of
these standard dialog boxes. There are many parameters and JAVA
allows you to be very flexible in the way that you use them. For
instance, there are standard icons that are displayed on these dialog
boxes, but you can
also make your own.
When using one of these standard dialog boxes, you may specify:
- the frame (owner)
- the title on the dialog box
- the message or question to be asked
- the icon displayed
- the buttons to be shown on the dialog box (i.e. OK, CANCEL, YES,
NO)
- a set of options to be asked
Instead of describing ALL the options and all combinations here, I have
decided to just give you a few templates that you can use.
Here
is
some code that tests various standard dialog boxes. It brings up
an
interface
with 9 buttons that allow you to "try out" the boxes. The
interface
looks as follows:

Here is the code for our test application. Notice the output
that appears in the
console when running the code. You should be able to figure out
how to get information
easily from your dialog boxes from this example.
import java.awt.*;
import java.awt.event.*;
import javax.swing.*;
public class StandardDialogTester extends
JFrame {
public StandardDialogTester
(String title) {
super(title);
setLayout(new
GridLayout(3, 3));
JButton aButton;
add(aButton
= new
JButton("Plain Message Box"));
aButton.addActionListener(new ActionListener()
{
public void
actionPerformed(ActionEvent e) {
JOptionPane.showMessageDialog(null,
"This
is a plain message !!!",
"Read This",
JOptionPane.PLAIN_MESSAGE);
}});
add(aButton
= new
JButton("Warning Message Box"));
aButton.addActionListener(new
ActionListener() {
public void
actionPerformed(ActionEvent e) {
JOptionPane.showMessageDialog(null,
"Don't
eat yellow snow.",
"Warning",
JOptionPane.WARNING_MESSAGE);
}});
add(aButton
= new
JButton("Error Message Box"));
aButton.addActionListener(new
ActionListener() {
public void
actionPerformed(ActionEvent e) {
JOptionPane.showMessageDialog(null,
"Your program has stopped
working !",
"Error",
JOptionPane.ERROR_MESSAGE);
}});
add(aButton
= new
JButton("Information Message Box"));
aButton.addActionListener(new
ActionListener() {
public void
actionPerformed(ActionEvent e) {
JOptionPane.showMessageDialog(null,
"You
better pass the final exam or else ...",
"Information",
JOptionPane.INFORMATION_MESSAGE);
}});
add(aButton
= new
JButton("Confirmation Dialog Box"));
aButton.addActionListener(new
ActionListener() {
public void
actionPerformed(ActionEvent e) {
int
result = JOptionPane.showConfirmDialog(null,
"Do you want me to erase your hard drive ?",
"Answer
this Question",
JOptionPane.YES_NO_OPTION);
if
(result == 0)
System.out.println("OK, I'm
erasing it now ...");
else
System.out.println("Fine then, you clean it up!");
}});
add(aButton
= new
JButton("Confirmation Dialog Box with Cancel"));
aButton.addActionListener(new
ActionListener() {
public void
actionPerformed(ActionEvent e) {
int
result = JOptionPane.showConfirmDialog(null,
"Do you want to overwrite the file ?",
"Answer
this Question",
JOptionPane.YES_NO_CANCEL_OPTION);
switch(result)
{
case
0: System.out.println("OK, but don't come crying
to me once its gone"); break;
case
1: System.out.println("Well you should pick a new
name
then"); break;
case
2: System.out.println("OK, I'll ask you again
later"); break;
}
}});
add(aButton
= new
JButton("Multiple Option Dialog Box"));
aButton.addActionListener(new
ActionListener() {
public void
actionPerformed(ActionEvent e) {
Object[] options = {"Outstanding",
"Excellent", "Good",
"Fair", "Poor"};
int
result = JOptionPane.showOptionDialog(null,
"How would you rate your
vehicle's performance ?",
"Pick
an Option",
JOptionPane.DEFAULT_OPTION,
JOptionPane.QUESTION_MESSAGE,
null,
options,
options[0]);
System.out.print("You have
rated your vehicle's performance as "
+ options[result]);
if
(result < 3)
System.out.println("We are glad you are pleased.");
else
System.out.println("Please explain why.");
}});
add(aButton
= new
JButton("Input Dialog Box"));
aButton.addActionListener(new
ActionListener() {
public void
actionPerformed(ActionEvent e) {
String inputValue =
JOptionPane.showInputDialog("Please
input your name");
System.out.println("Your name
is " +
inputValue);
}});
add(aButton
= new
JButton("Chooser Dialog Box"));
aButton.addActionListener(new
ActionListener() {
public void
actionPerformed(ActionEvent e) {
Object[] options = {"Apple",
"Orange", "Strawberry",
"Bannana", "Cherry"};
Object selectedValue = JOptionPane.showInputDialog(null,
"Choose your favorite fruit",
"Fruit Information",
JOptionPane.INFORMATION_MESSAGE,
null,
options,
options[1]);
System.out.println(selectedValue + "s sure do
taste yummy.");
}});
setDefaultCloseOperation(EXIT_ON_CLOSE);
pack(); //chooses reasonable window size based on component
prefered sizes
}
public static void
main(String args[]) {
new StandardDialogTester("Standard
Dialog Tester").setVisible(true);
}
}
Here are the dialog boxes that will appear.
Plain Message Box: 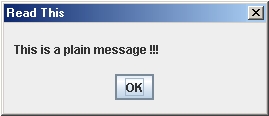
Information Message Box: 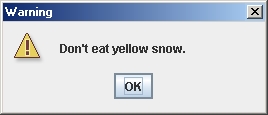
Error Message Box: 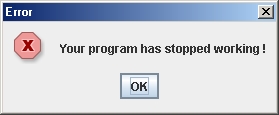
Information Message Box: 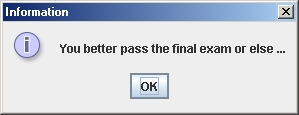
Confirmation Dialog Box: 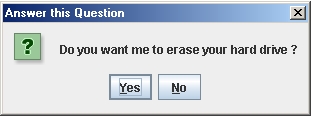
Confirmation Dialog Box with Cancel: 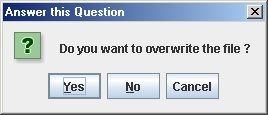
Select Option Dialog Box: 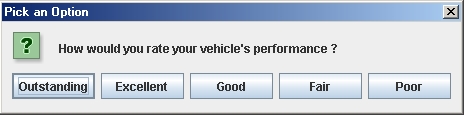
Input Dialog Box: 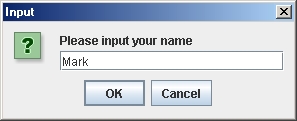
Option Dialog Box: 
There is another useful standard dialog box in JAVA
that is used for selecting files. It is called a JFileChooser.
Here is what it looks like:
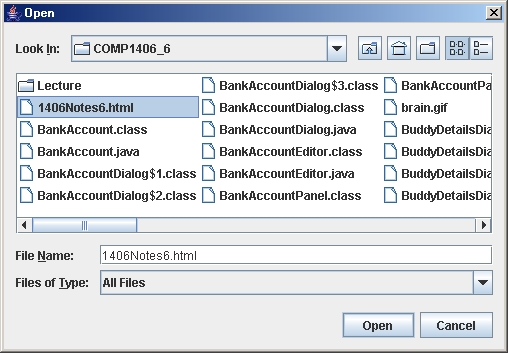
Here is some code that opens up a JFileChooser box and
displays the filename (no path) that the user selects.
JFileChooser chooser = new
JFileChooser();
int returnVal = chooser.showOpenDialog(this);
if (returnVal == JFileChooser.APPROVE_OPTION) {
System.out.println("You
chose to open this file: " +
chooser.getSelectedFile().getName());
}
There are more options available that allow you to set the filters and
starting directories. Take a look at the Swing API.
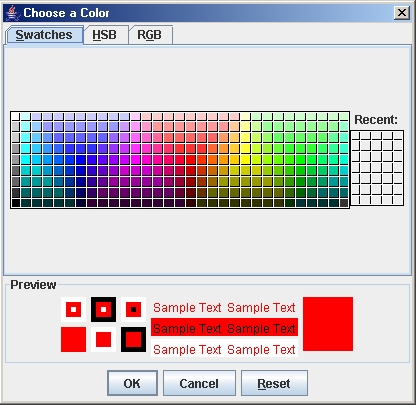
There is also a JColorChooser class
in JAVA that can be used to bring up a dialog box that allows you to
select a colour. Here is what it looks like:
You create and add a JColorChooser just
as you would any other component:
Color newColor =
JColorChooser.showDialog(
this,
// The parent window
"Choose a Color",
// Title on
Dialog Box
Color.RED);
//
Initial color selected
Notice that the dialog box returns the colour selected when the window
is closed.
| 6.3 Creating Your Own Dialog Boxes |
Often, our user interfaces can become cluttered as
many components are
placed on them. Some of the components' data are not needed
unless
the user performs some specific action. For example,
the
user may hit an "Fill out Form" button which would often bring up
another
window with all the form fields in it. This "new" window is
called a dialog box. Dialog boxes can be:
- modal: no other application window will
respond until this one is closed.
- forces the user to "deal with" the dialog box information
before continuing
- non-modal: can remain open while the user
works in other windows
Dialog boxes have an owner which is the window that
caused it to appear. This allows the owner window to close
the dialog box when it closes so that all windows belonging to the same
application are closed when the application shuts down.
Also, ethen the owner window is minimized, the dialog boxes are also
minimized.
There are two important terms pertaining to dialog boxes:
- Dialog client = the application
that causes the dialog box to appear
- Dialog model = the object(s) that
the dialog box should affect
Normally, an application communicates to its dialog box through a model
of some kind. That is, the owner opens up a dialog box,
passing model-specific information to it. The user may then
change this information from the dialog box, which in turn modifies the
model. When the dialog box is closed then,
the main application continues with the
modified model objects.
Here is how everything should work:
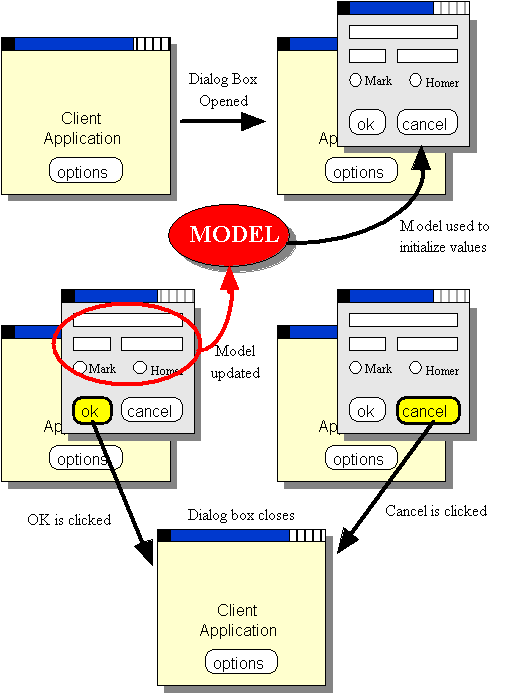
Notice that the model is used as the "middle-man" between the two
windows:
- When the dialog box is first opened, the model contents are used
to populate the components (i.e., fill in the text fields, button
selections etc...)
- The user then makes appropriate changes to the components.
- When the dialog box is closed with the OK button, the model is
updated with these new changes.
- When the dialog box is closed with the CANCEL button, the model
remains unchanged.
- When either button is clicked, the dialog box closes.
- The closing of the dialog box using the standard "close" (i.e.,
X at the top corner) should be treated as a cancel operation.
How do we make sure that we can have such interaction with the two
windows ?
We make the client implement the following interface
which we will define ourselves:
public interface DialogClientInterface
{
public void dialogFinished();
public void dialogCancelled();
}
So, if the client class implements this interface, it will be sure to
have these two methods:
public class MyApplication implements
DialogClientInterface {
...
...
public void dialogFinished() {
...
}
public void dialogCancelled() {
...
}
...
}
Now, since the client application class implements the interface, all
other classes know that they can call the dialogFinished() method
or the dialogCancelled() method.
Why would we want to call these methods from outside this class
? Dialog boxes are defined in separate classes, so the client
(i.e., usually the main application) has no idea what is going on
within those classes (nor
should it need to know). The client does, however, need to
know
the following:
- whether or not the interaction with the dialog box was
successful or whether or not it was cancelled
- whether or not the model has been changed
It is easy to see that the dialog box must of course know whether or
not it was cancelled (i.e., it has the OK and CANCEL buttons on
it). So, we can have the dialog box itself inform the
client application whether the dialog box was canceled or not by
calling one of these two methods defined in the DialogClientInterface
that the client implements. That is how the dialog
box
informs the client of what just happened within it. So,
we will need to pass in the client object itself to the dialog box
so that the dialog box can send
the dialogFinished() or the dialogCancelled() message
to the client. In fact, we already need to pass in the owner to
the dialog box ... which in this case will also implement a DialogClientInterface, so we do not
need any new parameters for our constructor.
public class SomeDialog extends JDialog {
// The client (usually
the caller of this dialog box)
private DialogClientInterface client;
// A constructor
that takes the model and client as parameters
public SomeDialog(Frame owner, ...){
...
}
private void okButtonPressed() {
...
((DialogClientInterface)this.getOwner()).dialogFinished();
}
private void cancelButtonPressed() {
...
((DialogClientInterface)this.getOwner()).dialogCancelled();
}
}
Here are the steps involved with creating a dialog box:
- Make your own dialog box class as a subclass of JDialog
- build your window as you would with a normal JFrame ... using
components/events/listeners
- make sure to use some kind of ok/apply &
cancel/close button combination. The typical behaviour
is that you should not modify any model objects for the application if
the cancel button is pressed or if window is manually closed.
- There are many constructors in the JDialog class.
We will use the following format for our constructors:
- public MyDialog(Frame
owner, String title, boolean modal,
ClassA modelA, ClassB modelB, ...) {
super(owner,
title, modal);
...
}
- specifying the owner frame ensures that the
dialog box is attached to the main application. In our case, the owner
will also need to be a class that implements the DialogClientInterface.
- the title will appear on the dialog box
titlebar
- modal indicates whether or not the dialog box
is to be modal
- we may supply numerous model-related
parameters to represent any information that is to be shared between
the main application (i.e., client) and the dialog box.
This model data will be used for both input and output information:
- input: use information in the model to set
up initial contents of the dialog window's components
- output: when the dialog closes the model
has the information required from the dialog box interaction
- Notice the call to the superclass constructor (this is a
standard JDialog constructor being called).
In some cases, we may not want the user of the dialog box
to
decide whether or not it should be modal, nor may we want them to
specify
the title. We can simply hard-code these into the dialog box if
we
wish:
public MyDialog(Frame
owner, ClassA modelA,
ClassB modelB, ...) {
super(owner, "Mt Cool Dialog
Box", true);
...
}
In addition to this, we will use the dispose() message
to dispose of (i.e., close and delete) the dialog box from within your
code.
Example:
In this example we will create a BankAccountDialog
that allows us to modify a BankAccount's owner name, address
and phone number. It will also show us the account number
and balance, but we will not be allowed to alter that
information. We use an extended version of the BankAccount
class that was used in COMP1405/1005 (we added here an address and
phone
number). We will design the dialog box to look like this:
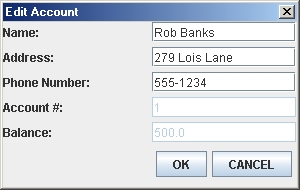
Notice that it shows the name, address, phone number, account number
and balance, but that the account number and balance are disabled
(grayed out) so that we cannot edit them. Also, notice the
OK and CANCEL buttons
(which typically appear at the bottom right of a dialog
box). Also,
notice that there are no minimize or maximize buttons on the
titlebar ... we will make this window non-resizable.
We will create this window by first creating a JPanel
containing the 5 text fields and their labels. We will set
it
up as the view part of the window so that the panel
class will not have any behaviour, it
will simply allow us to access the 3 editable fields through public get
methods.
import java.awt.*;
import javax.swing.*;
public class BankAccountPanel
extends JPanel {
// The components
needed to be used outside of this class
private JTextField nameTextField;
private JTextField addressTextField;
private JTextField phoneTextField;
// Make a get method
so that the name/address/phone can be accessed externally
public JTextField getNameTextField() {
return nameTextField; }
public JTextField
getAddressTextField() { return addressTextField; }
public JTextField getPhoneTextField()
{ return phoneTextField; }
// Add a constructor
that takes a BankAccount, so that we can populate the text fields
public BankAccountPanel (BankAccount account) {
// Fill in the text fields with bank account's
information
nameTextField = new
JTextField(account.getName());
addressTextField = new
JTextField(account.getAddress());
phoneTextField = new
JTextField(account.getPhone());
JTextField accField
= new JTextField(String.valueOf(account.getAccountNumber()));
JTextField balField = new
JTextField(String.valueOf(account.getBalance()));
// Disallow changing of balance and account number
accField.setEnabled(false);
balField.setEnabled(false);
// Set the layoutManager and add the components
setLayout(new
GridLayout(5,3,5,5));
add(new JLabel("Name:"));
add(nameTextField);
add(new JLabel("Address:"));
add(addressTextField);
add(new JLabel("Phone Number:"));
add(phoneTextField);
add(new JLabel("Account #:"));
add(accField);
add(new JLabel("Balance:"));
add(balField);
}
}
Notice:
- The constructor takes a BankAccount object. This is used
to "fill-in" the initial values of the panel.
- instance variables & get methods are made only for the
name/address/phone text fields since the other text fields may not be
changed (i.e., they are disabled).
- The code here does not make changes to the model bank account in
any way!!!
Now let us use this panel in our dialog box:
import java.awt.*;
import java.awt.event.*;
import javax.swing.*;
public class BankAccountDialog extends
JDialog {
private BankAccount
account; // The model
// The buttons and
main panel
private JButton okButton;
private JButton cancelButton;
private BankAccountPanel
bankAccountPanel;
// A constructor
that takes the model and client as parameters
public BankAccountDialog(Frame owner,
String title, boolean modal, BankAccount
acc) {
// Call the super constructor that does all the work
of
setting up the dialog
super(owner,title,modal);
account =
acc; // Store the model
// Make a panel with two buttons (placed side by side)
JPanel buttonPanel = new
JPanel();
buttonPanel.setLayout(new
FlowLayout(FlowLayout.RIGHT));
buttonPanel.add(okButton = new JButton("OK"));
buttonPanel.add(cancelButton = new JButton("CANCEL"));
// Make the dialog box by adding the bank account
panel
and the button panel
setLayout(new
BoxLayout(getContentPane(),
BoxLayout.Y_AXIS));
bankAccountPanel
= new BankAccountPanel(account);
add(bankAccountPanel);
add(buttonPanel);
// Prevent the window from being resized
setResizable(false);
// Listen for ok button click
okButton.addActionListener(new
ActionListener() {
public void actionPerformed(ActionEvent event){
okButtonClicked();
}});
// Listen for cancel button click
cancelButton.addActionListener(new
ActionListener() {
public void actionPerformed(ActionEvent event){
cancelButtonClicked();
}});
// Listen for window closing: treat like cancel button
addWindowListener(new
WindowAdapter() {
public void windowClosing(WindowEvent event) {
cancelButtonClicked();
}});
// Set the
size of the dialog box
setSize(300, 190);
}
private void okButtonClicked(){
//
Update model to show changed owner name
account.setName(bankAccountPanel.getNameTextField().getText());
account.setAddress(bankAccountPanel.getAddressTextField().getText());
account.setPhone(bankAccountPanel.getPhoneTextField().getText());
// Tell the client that ok was clicked, in case
something needs to be done there
if (getOwner()
!=
null)
((DialogClientInterface)getOwner()).dialogFinished();
dispose();
// destroy this dialog box
}
private void cancelButtonClicked(){
//
Tell the client that cancel was clicked, in case something
needs to be done there
if (client != null)
((DialogClientInterface)getOwner()).dialogCancelled();
dispose();
// destroy this dialog box
}
}
Notice:
- The window is made non-resizable by using setResizable(false);
- When the OK button is clicked, the name/address/phone text of
the dialog box is accessed and updated in the model.
- The client is informed when OK or CANCEL is clicked.
- After informing the client, the dialog box is disposed of.
- Window closing is treated the same as when pressing the CANCEL
button.
So, how do we test out this dialog box ? We should create
an application that opens it (perhaps due to a button
press).
Here is the application that we will create:
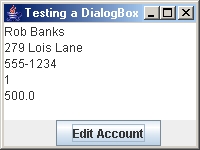
This application will maintain a BankAccount object as the
model and show its contents in a JTextArea object.
When the user
clicks the Edit Account button, we will create/open the dialog
box.
The dialog box will be modal, so we will have to finish
working
with it before we go back to the main window here. Once the
dialog
box has been closed, any changes that were made should be reflected in
the
text area. Here is the code:
import java.awt.*;
import java.awt.event.*;
import javax.swing.*;
public class BankAccountEditor extends
JFrame implements DialogClientInterface,
ActionListener {
private BankAccount
model;
private JTextArea info;
public BankAccountEditor(String
title, BankAccount account){
super(title);
model = account; // store the model
// create a text area and an edit button
info = new
JTextArea();
JButton editButton = new
JButton("Edit Account");
editButton.addActionListener(this);
setLayout(new
BoxLayout(getContentPane(),
BoxLayout.Y_AXIS));
add(info);
add(editButton);
update(); // fill in the text area
setDefaultCloseOperation(EXIT_ON_CLOSE);
setSize(200, 150);
}
// Handle the EDIT
button
public void actionPerformed(ActionEvent
e) {
//
Create a new dialog box
BankAccountDialog
dialog = new BankAccountDialog (this,
"Edit Account", true, model);
System.out.println("About to open the dialog box
...");
dialog.setVisible(true); // Open the dialog box
System.out.println("Dialog box has been closed.");
}
public void
dialogFinished() {
System.out.println("Changes accepted, Account has been changed");
update();
}
public void
dialogCancelled() {
System.out.println("Changes aborted, Account has not been changed");
//no
need to call update, since nothing has changed
}
private void update() {
//update
the info text area to reflect the account balance
info.setText(
model.getName() + '\n' + model.getAddress() + '\n' +
model.getPhone() + '\n' + model.getAccountNumber() + '\n' +
model.getBalance());
}
public static void main(String
args[]) {
BankAccount b = new
BankAccount("Rob Banks", "279 Lois Lane", "555-1234");
b.deposit(500);
BankAccountEditor
frame = new BankAccountEditor("Testing a
DialogBox", b);
frame.setVisible(true);
}
}
Try out the code yourself. Notice that the dialog box is
indeed modal. Try changing information in the dialog box
and see if changes are reflected back in the editor application
window. Notice
that when the dialog box is not modal, we can have multiple instances
of it open
at the same time.
| 6.4 E-mail Buddy Dialog Box Example |
Here we discuss another example application that
shows the use of a dialog
box. Consider having many buddies that you send
e-mail to.
You would like to make a nice little electronic address book that you
can
store
the buddy's names along with his/her e-mail addresses. Perhaps
you
even want to categorize the buddies as being "hot" (i.e., you talk to
them
often), or not-so-hot.
What exactly is an e-mail buddy ? Well we can easily develop a
model of an EmailBuddy
as follows:
// This class represents a
"buddy" whose
email address is kept.
// An additional boolean indicates whether
or not this is a
// friend that is "hot" (i.e. contacted
often)
public class EmailBuddy {
private String name;
private String address;
private boolean onHotList;
// Here are some
constructors
public EmailBuddy()
{
name = "";
address = "";
onHotList = false;
}
public EmailBuddy(String
aName, String anAddress) {
name = aName;
address = anAddress;
onHotList = false;
}
// Here are the get
methods
public String getName() { return
name; }
public String getAddress() { return
address; }
public boolean onHotList() { return
onHotList; }
// Here are the set
methods
public void setName(String
newName) { name = newName; }
public void setAddress(String
newAddress) { address = newAddress; }
public void onHotList(boolean
onList) { onHotList = onList; }
// The appearance of
the buddy
public String toString() {
return(name);
}
}
As can be seen, there is nothing difficult here ... just your standard
"run-of-the-mill" model class. However, this class alone doe not
represent the whole model for our GUI since we will have many of these EmailBuddy
objects. So, we will make a Vector of them when we make
the
interface.
The task now is to design a nice interface for the main
application. To start, we must decide what the interface should
do. Here is a possible interface:
- A list of all buddies is shown (names only)
- We should be able to
- Add and Remove buddies from the list
- Edit buddies when their name or email changes
- Show only those buddies that are "hot" or perhaps
show all of them
Assume that we have decided upon the following view for the interface:
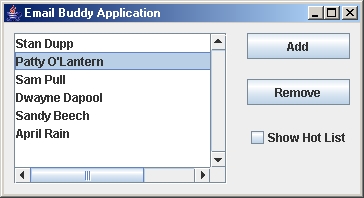
Notice that the interface does not show the e-mail addresses in the
list. It may look cluttered, but we could certainly have done
this. Perhaps
we could have made a second list box or something that would show the
e-mail
addresses. Here is a good exercise: make a JTextField
just beneath
the list that will show the e-mail address of the currently selected EmailBuddy
in the list. This is not hard to do. Nevertheless, it is
not necessary
for the purposes of explaining this dialog box example.
How can we build the view for this interface ? We will start
with a
JPanel. We will use GridBagLayout to allow nice
resizing.
import java.awt.*;
import java.awt.event.*;
import javax.swing.*;
// This is the Panel that contains
represents the view of the
// Email buddy application.
public class EmailBuddyPanel extends
JPanel {
private JButton
addButton;
private JButton
removeButton;
private JList
buddyList;
private JCheckBox hotListButton;
// These are the get
methods that are used to access the components
public JButton getAddButton() { return
addButton; }
public JButton getRemoveButton() { return
removeButton; }
public JCheckBox getHotListButton() { return
hotListButton; }
public JList getBuddyList() { return
buddyList; }
// This is the
default constructor
public EmailBuddyPanel(){
super();
// Use a GridBagLayout (lotsa fun)
GridBagLayout layout
= new GridBagLayout();
GridBagConstraints
layoutConstraints = new GridBagConstraints();
setLayout(layout);
// Add the buddy list
buddyList = new
JList();
buddyList.setPrototypeCellValue("xxxxxxxxxxxxxxxxxxxxxxxxxxxxxxxxxxxxxxxx");
JScrollPane scrollPane
= new JScrollPane( buddyList,
ScrollPaneConstants.VERTICAL_SCROLLBAR_ALWAYS,
ScrollPaneConstants.HORIZONTAL_SCROLLBAR_AS_NEEDED);
layoutConstraints.gridx = 0; layoutConstraints.gridy =
0;
layoutConstraints.gridwidth = 3; layoutConstraints.gridheight
= 5;
layoutConstraints.fill
= GridBagConstraints.BOTH;
layoutConstraints.insets = new Insets(10, 10, 10, 10);
layoutConstraints.anchor = GridBagConstraints.NORTHWEST;
layoutConstraints.weightx = 1.0; layoutConstraints.weighty
= 1.0;
layout.setConstraints(scrollPane, layoutConstraints);
add(scrollPane);
// Add the Add button
addButton = new
JButton("Add");
layoutConstraints.gridx = 3; layoutConstraints.gridy =
0;
layoutConstraints.gridwidth = 1; layoutConstraints.gridheight
= 1;
layoutConstraints.fill
= GridBagConstraints.BOTH;
layoutConstraints.insets = new Insets(10, 10, 10, 10);
layoutConstraints.anchor = GridBagConstraints.EAST;
layoutConstraints.weightx = 0.0; layoutConstraints.weighty
= 0.0;
layout.setConstraints(addButton, layoutConstraints);
add(addButton);
// Add the Remove button
removeButton = new
JButton("Remove");
layoutConstraints.gridx = 3; layoutConstraints.gridy =
1;
layoutConstraints.gridwidth = 1; layoutConstraints.gridheight
= 1;
layoutConstraints.fill
= GridBagConstraints.BOTH;
layoutConstraints.insets = new Insets(10, 10, 10, 10);
layoutConstraints.anchor = GridBagConstraints.EAST;
layoutConstraints.weightx = 0.0; layoutConstraints.weighty
= 0.0;
layout.setConstraints(removeButton, layoutConstraints);
add(removeButton);
// Add the ShowHotList button
hotListButton = new
JCheckBox("Show Hot List");
layoutConstraints.gridx = 3; layoutConstraints.gridy =
3;
layoutConstraints.gridwidth = 1; layoutConstraints.gridheight
= 1;
layoutConstraints.fill
= GridBagConstraints.BOTH;
layoutConstraints.insets = new Insets(10, 10, 10, 10);
layoutConstraints.anchor = GridBagConstraints.EAST;
layoutConstraints.weightx = 0.0; layoutConstraints.weighty
= 0.0;
layout.setConstraints(hotListButton, layoutConstraints);
add(hotListButton);
}
}
Notice that there is nothing really new here either. We did
however, make some "get" methods for the
components so that we can access them from outside this class.
Now for the actual dialog box. Ask yourself these questions:
- What is the purpose of the dialog box ?
- What causes the dialog box to appear ?
The dialog box is used to enter information/details about a particular
buddy. It should appear when the user attempts to add an EmailBuddy.
If
we "play our cards just right", we will be able to use the same
dialog box to allow an "already existing" EmailBuddy to have
his/her details changed.
Here are some more questions that need to be answered:
- What information should the dialog box show ?
- What information needs to be changed by the dialog box ?
- What is a good descriptive title for the dialog box ?
- How can the information be shown nicely ?
Here are the answers:
- The dialog box should show all information about a particular
EmailBuddy. This includes name, address and hot list status.
- The user should be able to change all 3 pieces of information
about the buddy
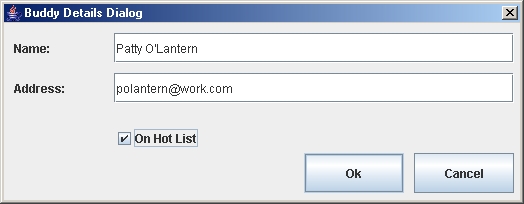
- We should call it something like "Buddy Details" or "Buddy
Information"
- Lay it out nicely. Here is an idea:
Don't forget that we need to add the OK and CANCEL buttons as
well. Also, there is no need to be able to resize the dialog box
so we can just disable the resizing.
Below is a method that will be called from our dialog class to add
the components to the dialog box. It will take an EmailBuddy
object as a parameter so that when the dialog box opens, we can
populate the text fields with values indicating the EmailBuddy's
current information. This parameter will represent
the model that is affected by the dialog box.
// This code adds the
necessary components to the interface
private void
buildDialogWindow(EmailBuddy
aBuddy) {
setLayout(null);
// Add the name label
aLabel = new
JLabel("Name:");
aLabel.setLocation(10,10);
aLabel.setSize(80, 30);
add(aLabel);
// Add the name field
nameField = new
JTextField(aBuddy.getName());
nameField.setLocation(110, 10);
nameField.setSize(400,
30);
add(nameField);
// Add the address label
aLabel = new
JLabel("Address:");
aLabel.setHorizontalAlignment(JLabel.LEFT);
aLabel.setLocation(10,50);
aLabel.setSize(80, 30);
add(aLabel);
// Add the address field
addressField = new
JTextField(aBuddy.getAddress());
addressField.setLocation(110, 50);
addressField.setSize(400, 30);
add(addressField);
// Add the onHotList button
hotListButton = new
JCheckBox("On Hot List");
hotListButton.setSelected(aBuddy.onHotList());
hotListButton.setLocation(110, 100);
hotListButton.setSize(120, 30);
add(hotListButton);
// Add the Ok button
okButton = new
JButton("Ok");
okButton.setLocation(300, 130);
okButton.setSize(100,
40);
add(okButton);
// Add the Cancel button
cancelButton = new
JButton("Cancel");
cancelButton.setLocation(410, 130);
cancelButton.setSize(100, 40);
add(cancelButton);
}
We will now look at the code needed to create the dialog box and get
its behaviour working correctly:
import java.awt.*;
import java.awt.event.*;
import javax.swing.*;
import javax.swing.event.*;
public class BuddyDetailsDialog extends
JDialog {
// This is a pointer
to the email buddy that is being edited
private EmailBuddy
aBuddy;
// These are the
components of the dialog box
private
JLabel aLabel;
private JTextField
nameField;
private JTextField
addressField;
private
JCheckBox hotListButton;
private
JButton okButton;
private
JButton cancelButton;
public BuddyDetailsDialog(Frame
owner, String title, boolean modal, EmailBuddy bud){
super(owner,title,modal);
aBuddy
= bud;
// Put all the components onto the window and given them initial values
buildDialogWindow(aBuddy);
// Add listeners for the Ok and Cancel buttons as well as window closing
okButton.addActionListener(new ActionListener() {
public void actionPerformed(ActionEvent event){
okButtonClicked();
}});
cancelButton.addActionListener(new ActionListener() {
public void actionPerformed(ActionEvent event){
cancelButtonClicked();
}});
addWindowListener(new
WindowAdapter() {
public void windowClosing(WindowEvent event) {
cancelButtonClicked();
}});
setSize(526, 214);
}
private
void
buildDialogWindow(EmailBuddy
aBuddy) {
//
This code is given above
}
private void
okButtonClicked(){
aBuddy.setName(nameField.getText());
aBuddy.setAddress(addressField.getText());
aBuddy.onHotList(hotListButton.isSelected());
if (getOwner() !=
null)
((DialogClientInterface)getOwner()).dialogFinished();
dispose();
}
private void
cancelButtonClicked(){
if (getOwner() !=
null)
((DialogClientInterface)getOwner()).dialogCancelled();
dispose();
}
}
Once again, we see that we just add listeners for the OK and CANCEL
buttons as well as the window closing event. Then we merely make
methods that are called for each.
Notice that when the OK button is clicked, the 3 pieces of
changed buddy data are stored in the model buddy so that the buddy will
have been altered by this dialog box. Then we inform the client
that OK was pressed. For the cancel button, there is no
work to do, just informing the client that CANCEL was pressed.
We are not done yet ! Now we need to work on the actual
application that will be calling the dialog box.
We will call the class EmailBuddyApp
and it will extend JFrame. It will be the
class that opens the
dialog box and so it must implement the DialogClientInterface.
We will need to store the buddies that we will be making, so we make a
Vector as an instance variable. We will first make the
application
work such that we will be able to add buddies to the list. Here
is
the basic framework
for the application:
import java.awt.*;
import java.awt.event.*;
import javax.swing.*;
import javax.swing.event.*;
import java.util.*;
public class EmailBuddyApp extends JFrame
implements DialogClientInterface {
// Store the model as a
vector of email buddies
private
Vector buddies;
// Store the view that
contains the components
EmailBuddyPanel view;
// Here are the
component listeners
ActionListener
theAddButtonListener;
// Here is the default
constructor
public EmailBuddyApp(String
title){
super(title);
//
Initially, no buddies
buddies = new
Vector ();
// Make a new viewing panel and add it to the pane
add(view = new
EmailBuddyPanel());
// Make a listener for the add button
theAddButtonListener =
new ActionListener() {
public
void actionPerformed(ActionEvent
event) {
addBuddy();
}};
setDefaultCloseOperation(EXIT_ON_CLOSE);
setSize(600,300);
//
Start off with everything updated properly
update();
}
// Enable all listeners
private void enableListeners() {
view.getAddButton().addActionListener(theAddButtonListener);
}
// Disable all listeners
private void disableListeners() {
view.getAddButton().removeActionListener(theAddButtonListener);
}
// This is called when
the user clicks the add button
private void addBuddy() {
EmailBuddy aBuddy
= new EmailBuddy();
// Add the buddy to the end of the Vector
buddies.add(aBuddy);
// Now bring up the dialog box
BuddyDetailsDialog
dialog = new BuddyDetailsDialog(this, "Buddy Details Dialog", true,
aBuddy);
dialog.setVisible(true);
}
// Called when the
dialog box is closed with the Ok button
public void dialogFinished() {
update();
}
// Called when the
dialog box is closed with the cancel button or manually closed
public void dialogCancelled() {
//
Remove the latest buddy that was added if in add mode
buddies.remove(buddies.get(buddies.size()-1));
}
// Update the list
private void updateList() {
//
Update the list contents and select the last buddy
view.getBuddyList().setListData(buddies);
if (buddies.size>0)
view.getBuddyList().setSelectedValue((EmailBuddy)buddies.get(buddies.size()-1),
true);
}
// Update the GUI
private void update() {
disableListeners();
updateList();
enableListeners();
}
// Code that starts the
application
public static void
main(String args[]) {
EmailBuddyApp frame
= new EmailBuddyApp("Email Buddy
Application");
frame.setVisible(true);
}
}
Perhaps the most interesting portions of the code are the addBuddy(),
dialogCancelled() and updateList()
methods. When the user adds a buddy, we:
- make a new Buddy
- add the buddy to the end of the Vector of buddies
- open a dialog box on this buddy
Since the dialog box is modal, nothing else happens until the dialog
box is closed. When closed, either the dialogFinished
or
dialogCancelled methods are called. If the OK
button was pressed, then dialogFinished is called and
there is
no work to be done except to update the screen. This is because
the
dialog box already made the appropriate changes to the EmailBuddy and
we
merely
need to reflect the changes in the interface. If dialogCancelled
was called, then the user has canceled his "request to make
changes"
and therefore we need to remove the buddy that we added just before the
dialog
box
was opened. We do not need to update anything however, since the
interface
appearance will not have changed.
Now ... what about the remove button
? To get the remove button
to work, we will make some additions and changes to the
code. What buddy
gets
removed ? Probably the one that is currently selected from the
list.
Here are the additions:
- Add a new instance variable:
ActionListener
theRemoveButtonListener;
- Make a new listener in the constructor:
theRemoveButtonListener
= new ActionListener() {
public
void actionPerformed(ActionEvent
event){
removeBuddy();
}};
- Add these lines to the enableListeners() and disableListeners()
methods, respectively:
view.getRemoveButton().addActionListener(theRemoveButtonListener);
view.getRemoveButton().removeActionListener(theRemoveButtonListener);
- Add this method to do the removing:
- Add a line to the update()
method (after the list is
updated):
private void
update() {
disableListeners();
updateList();
updateRemove();
enableListeners();
}
- Add this method to update the remove button so that it is
disabled when nothing is selected in the list:
private void updateRemove() {
view.getRemoveButton().setEnabled(view.getBuddyList().
getSelectedValue() != null);
}
Notice however, that the Remove button code is dependent on the
buddy list JList. That is, it accesses the selected
value from this list. In order to keep our interface clean,
we should alter the code by storing the selected value in a field and
accessing this from the Remove button code. To do this, we
create an instance field called selectedBuddy and add a
listener to the list to set it:
// Add these instance variable
private
EmailBuddy
selectedBuddy;
private
ListSelectionListener buddyListSelectionListener;
//
In the constructor, make a listener to allow selection of buddies from
the list
buddyListSelectionListener = new ListSelectionListener() {
public
void valueChanged(ListSelectionEvent
event){
selectBuddy();
}};
// This is called when the user selects a buddy from the list
private void
selectBuddy() {
selectedBuddy = (EmailBuddy)(view.getBuddyList().getSelectedValue());
update();
}
// In the constructor, set the field to null
selectedBuddy = null;
- Change these methods now to use the selectedBuddy:
private void updateRemove() {
view.getRemoveButton().setEnabled(selectedBuddy
!= null);
}
private void removeBuddy() {
if
(selectedBuddy != null) {
buddies.remove(selectedBuddy);
update();
selectBuddy();
}
}
There are a few other places that we can now start using the
selectedBuddy field.
What about the hot list ? Well we
have to "hide" some of the
buddies when it is on. We will have to make a listener as well so
that when the check box is toggled, the changes occur right
away. Here
are the additions:
- Add a new instance variable:
ActionListener hotListListener;
- Make a new listener in the constructor:
hotListListener
= new ActionListener() {
public
void actionPerformed(ActionEvent
event){
toggleHotList();
}
};
- Add these lines to the enableListeners() and disableListeners()
methods, respectively:
view.getHotListButton().addActionListener(hotListListener);
view.getHotListButton().removeActionListener(hotListListener);
- Add this method to do the toggling:
private void toggleHotList() {
update();
}
- Change the updateList() method so that we
display the appropriate items in the list:
private void updateList() {
boolean
foundSelected = false;
// If the hot list is on, find all buddies that are on the hot list
if
(view.getHotListButton().isSelected()) {
Vector temp = new Vector();
for
(int i=0; i<buddies.size(); i++) {
EmailBuddy aBuddy = (EmailBuddy)buddies.get(i);
if (aBuddy.onHotList()) {
temp.add(aBuddy);
if (aBuddy == selectedBuddy)
foundSelected = true;
}
}
view.getBuddyList().setListData(temp);
if (!foundSelected)
selectedBuddy = null;
}
else
view.getBuddyList().setListData(buddies);
if
(selectedBuddy != null)
view.getBuddyList().setSelectedValue(selectedBuddy, true);
}
Notice that we look for which buddy is currently selected and
update the selectedBuddy variable accordingly.
What if we want to edit a buddy, not just to add one
? We will have
to decide what action will cause the editing to take place. One
approach is to have the user double click on the buddy in the list and
the dialog box will come up with that buddy's details within it.
We can then make changes to the data and close the dialog box.
To do this, notice that we currently have some small problems:
- When CANCEL is clicked, we are removing the last
EmailBuddy
from the list. This should not happen when editing.
We can solve this problem by keeping a boolean flag which indicates
whether or not we are in the midst of adding a buddy or whether or not
we are editing. Here are the changes:
- Add a new instance variable to maintain the current "mode"
(i.e.,
add or edit). Also, we will be making a listener for the
double-click
action.
private boolean
inAddMode;
MouseListener
doubleClickSelectionListener;
- Make a new listener in the constructor:
doubleClickSelectionListener
= new MouseAdapter() {
public
void mouseClicked(MouseEvent event){
if (event.getClickCount() == 2)
editBuddy();
}};
- Add these lines to the enableListeners() and disableListeners()
methods, respectively:
view.getBuddyList().addMouseListener(doubleClickSelectionListener);
view.getBuddyList().removeMouseListener(doubleClickSelectionListener);
- Add this method to do the editing.
It brings up a dialog box for the selected item in the list:
private void editBuddy() {
inAddMode = false;
if
(view.getBuddyList().getSelectedValue() == null) return;
BuddyDetailsDialog
dialog =
new BuddyDetailsDialog(this, "Buddy
Details Dialog", true, selectedBuddy);
dialog.setVisible(true);
}
Notice that we check to make sure there is a buddy selected before we
open a dialog box.
- Add this line to the addBuddy() method before the dialog
box is opened:
inAddMode = true;
- Make this change to the dialogCancelled() method:
public void dialogCancelled() {
if (inAddMode)
{
// Remove the latest buddy that was added if in add mode
buddies.remove(buddies.get(buddies.size()-1));
}
inAddMode = false;
update();
}
We are almost done now. The remove
button does not refresh
properly. That is, when nothing is selected, the remove button is
disabled.
If we then make a selection in the list (i.e., single click), the
button
still remains disabled. We should fix this. Do you know how
? Of course you do. Just add an event handler for making
list
selections. It just needs to call update() and the remove
button
will re-enable itself.