| COMP1406/1006 - Design and Implementation of Computer Applications |
Winter 2006
|
8 Graphics |
Here are the individual topics found in this set of notes (click on one to go there):
| 8.1 Doing Simple Graphics |
The java.awt package has a class called Graphics that permits the drawing of various shapes. The class is abstract and so there is no constructor. Instead, JAVA provides a getGraphics() method that can be sent to any window component which returns an instance of this Graphics class (i.e., each component keeps an instance of that class by default). Think of each component having its own "pen" that can only be used to draw in that component's "space", just like the pens attached to kiosks at the bank.
There are a set of drawing functions that allow you to draw onto a component's area. Since a particular graphics object belongs to one specific component, you can only draw on that component with it. Most drawing functions allow you to specify x and y coordinates. The coordinate (x,y)=(0,0) is at the top left corner of the component's area. So all coordinates are with respect to the component's area.
Here are just some of the methods available in the Graphics class (look in the JDK API for more info):
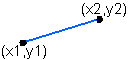
// Draw a line from (x1, y1) to (x2,y2)
public abstract void drawLine(int x1, int y1, int x2, int y2);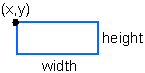
// Draw a rectangle with its top left at (x, y) having the given width and height
public abstract void drawRect(int x, int y, int width, int height);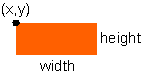
// Draw a filled rectangle with its top left at (x, y) having the given width and height
public abstract void fillRect(int x, int y, int width, int height);
// Erase a rectangular area by filling it in with the background color
public abstract void clearRect(int x, int y, int width, int height);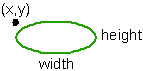
// Draw an oval with its top left at (x, y) having the given width and height
public abstract void drawOval(int x, int y, int width, int height);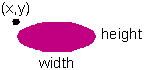
// Draw a filled oval with its top left at (x, y) having the given width and height
public abstract void fillOval(int x, int y, int width, int height);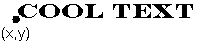
// Draw the given String with its bottom left at (x, y)
public abstract void drawString(String str, int x, int y);
// Draw a polygon with the given coordinates
public abstract void drawPolygon(int[] x, int[] y, int numEdges);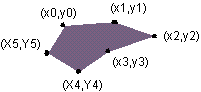
// Draw a filled polygon with the given coordinates
public abstract void fillPolygon(int[] x, int[] y, int numEdges);
// Set the foreground and fill color of the Graphics object
public abstract void setColor(Color c);ABCDEFG // Set the Font for use with drawString
public abstract void setFont(Font font);
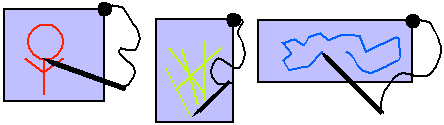
| Example:
This code makes a simple JFrame and then draws some text on it wherever the user clicks the mouse. As it turns out, we can draw directly to the frame of a window. We don't need to add any components for this example. To the right is a snapshot of the running program. You will notice three things about this example:
|
|
import java.awt.event.*;
import javax.swing.*;
public class TextDrawingExample extends JFrame {
public TextDrawingExample (String title) {}
super(title);addMouseListener {new MouseAdapter() {
public void mousePressed(MouseEvent e) {
getGraphics().drawString("Hello", e.getX(), e.getY());
}});
setDefaultCloseOperation(EXIT_ON_CLOSE);
setSize(300, 300);
}
public static void main(String args[]) {
new TextDrawingExample("Text Drawing Example").setVisible(true);
}
| Example:
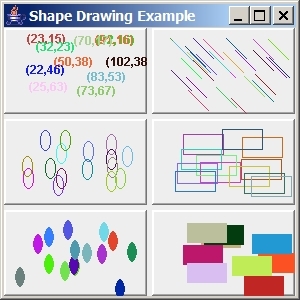
In this example, we will set up six JLabels, each one allowing
a different shape to be drawn onto it. We will set up a single event
handler for all mouse presses and within that method we will ask which label
has been clicked on and then draw the corresponding shape onto the label.
The shapes will be drawn with different colors each time. We use Math.random()
to get a random number for creating a random color. To the right
is a snapshot of the working program. You will notice that:
|
|
Here is the code:
import java.awt.*;
import java.awt.event.*;
import javax.swing.*;
public class ShapeDrawingExample extends
JFrame {
private JLabel labels[];
public ShapeDrawingExample(String
title) {
super(title);
setLayout(new GridLayout(3,2,5,5));
labels = new
JLabel[6];
for (int
i=0; i<6; i++) {
getContentPane().add(labels[i] = new JLabel());
labels[i].setBorder(BorderFactory.createRaisedBevelBorder());
}
addListeners();
setDefaultCloseOperation(EXIT_ON_CLOSE);
setSize(300, 300);
}
// Add listener for a mouse
press
private void addListeners() {
MouseAdapter
anAdapter = new MouseAdapter() {
public void mousePressed(MouseEvent
e) {
JLabel area = (JLabel)e.getSource();
Graphics g = area.getGraphics();
// Get a random color
g.setColor(new Color((float)Math.random(),
(float)Math.random(),
(float)Math.random()));
// Find the label that caused this event
int labelNumber;
for (labelNumber=0; labelNumber<6; labelNumber++) {
if (area == labels[labelNumber]) break;
}
int x = e.getX();
int y = e.getY();
// Now decide what to draw
switch (labelNumber) {
case 0: g.drawString("(" + String.valueOf(x)
+ "," +
String.valueOf(y) + ")", x, y); break;
case 1: g.drawLine(x, y, x+20, y+20); break;
case 2: g.drawOval(x, y, 10, 20); break;
case 3: g.drawRect(x, y, 40, 20); break;
case 4: g.fillOval(x, y, 10, 20); break;
case 5: g.fillRect(x, y, 40, 20); break;
}
}};
//
Add mouse listeners to all labels (for doing something upon mouse presses)
for (int
i=0; i<6; i++)
labels[i].addMouseListener(anAdapter);
}
public static void main(String
args[]) {
new ShapeDrawingExample("Shape Drawing
Example").setVisible(true);
}
}
| 8.2 Repainting Components |
The repaint() method actually calls a method called paintComponent(Graphics g), which is also inherited from the JComponent class. However, the default inherited paintComponent() method does not know what you want to be painted. In order to tell it what to actually redraw, you need to override this method by writing your own paintComponent() method which will specify exactly how to draw your graphics.
To add this functionality to our previous two examples, we would have to "keep track of" all the graphical shapes that we have been drawing (as well as their attributes, such as location, dimension and colour) so that in our paintComponent() method, we can redraw all of them properly each time.
The previous two examples showed how simple graphics can be drawn effortlessly on a frame or on a label. In fact, you can draw on any component. The component that is intended for general purpose drawing is a JPanel.
Note in the older AWT framework of JAVA, a special class called a Canvas was used for drawing using a paint() method, not the paintComponent() method. JPanels in the newer Swing library have all the capabilities of the old Canvas class built-in and should be used instead. In fact if the older paint() method is used you can expect bugs, so use the JPanels and paintComponent() method instead.The common strategy in JAVA for drawing on a blank area is to make your own class which is a subclass of JPanel. This class should implement, or override, the paintComponent() method. When we override this method however, we will be sure to call the super method so that the default drawing of the component still occurs.
|
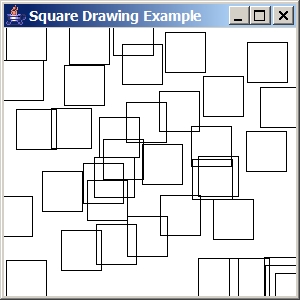
Example: In this example, we create a subclass of JPanel on which we will keep track of mouse click locations and draw 40x40 pixel squares centered at each of these locations. We will override the paintComponent() method so that the squares will be properly redrawn whenever we (or JAVA) call repaint() or when the window is resized. The application itself is not so exciting to look at, but rather the underlying concept of painting on the panel is what is important. In this example, you may notice a couple of things:
|
|
import java.util.*;
import java.awt.*;
import java.awt.event.*;
import javax.swing.*;
// This class represents a panel on which 40x40
pixel squares can be drawn.
// The squares are centered around where the
user clicks.
public class SquareCanvas extends JPanel implements
MouseListener {
// Keep track of all square
center positions
private ArrayList<Point> squares;
// Default constructor
public SquareCanvas()
{
squares = new ArrayList<Point>();
setBackground(Color.white);
addMouseListener(this);
}
// This is the method that
is responsible for displaying the contents of the canvas
public void paintComponent(Graphics graphics) {
//
Draw the component as before (i.e., default look)
super.paintComponent(graphics);
//
Now draw all of our squares
graphics.setColor(Color.black);
for (Point center: squares)
graphics.drawRect(center.x
- 20, center.y - 20, 40, 40);
}
// These are unused MouseEventHandlers.
Note that we could have
// used an Adapter class
here. However, a typical drawing
// application would make
use of these other events as well.
public void mouseClicked(MouseEvent event) {}
public void mouseEntered(MouseEvent event) {}
public void mouseExited(MouseEvent event) {}
public void mouseReleased(MouseEvent event) {}
// Store the mouse location
when it is pressed
public void mousePressed(MouseEvent event) {
squares.add(event.getPoint());
repaint(); // this will
call paintComponent()
}
public static void main(String
args[]) {
JFrame
frame = new JFrame("Square Drawing Example");
frame.add(new SquareCanvas());
frame.setDefaultCloseOperation(JFrame.EXIT_ON_CLOSE);
frame.setSize(300, 300);
frame.setVisible(true);
}
}
Notice how we are redrawing the panel by first making a call to super.paintComponent().
This ensures that the panel's background is redrawn (i.e., erased) before
we start drawing again. If we did not do this call, our squares
would still be drawn, but the background color for the window (i.e., white
in this case) would not be shown. We would end up with the light
gray default background coloring of the JFrame.
| 8.3 Displaying Images |
We can load an image from the disk by asking the Toolkit class for an instance of Toolkit (i.e., default will do fine) and then get the image as follows:
Image myImage = Toolkit.getDefaultToolkit().createImage("picture.gif");
The code loads and returns an Image object from the file entitled picture.gif but it does not display the image. We can then display the image by asking a Graphics object to draw the image:
g.drawImage(anImage, x, y, null);
The image is drawn with its top-left corner at (x, y) in this graphics
context's coordinate space. The 4th parameter can be any class that
implements the ImageObserver interface. This interface is used
as a means of informing a class when an image is done being loaded or drawn
(since images in general may take a while to load or draw ... especially if
being loaded from a network). This strategy of informing interested
classes of image completion, allows more efficient use of process cycles so
that the program does not sit idly by doing nothing while the image is being
loaded/drawn. We will keep things simple in our example and set this
value to null so that nobody is informed when the image is loaded or
drawn.
One final issue that we are interested in is with respect to the image
size. We may want to create a JPanel that has the exact same
size of the image (e.g., for use as a background image for the panel). In
this case, we can ask an image for its width and height before choosing the
size of our panel. There are getWidth() and getHeight()
methods that we can send to our Image object to obtain these values.
However, there is one minor issue. While the image is being loaded
(which may take a while), the value returned from getWidth() and getHeight()
is -1. So, we have to introduce a delay in our program by waiting until
these methods return valid results:
while ((anImage.getWidth(null) == -1) && (anImage.getHeight(null) == -1));
Notice as well that these methods take an ImageObserver as a parameter
(which we set to null). By using a proper ImageObserver, we
would not have to put in this delay, but could perform other application-specific
tasks while we wait for the image to be loaded.
Now we may set the "preferred size" of the panel. Note that setting
the "size" of the panel is not useful since when placed on a frame, the frame's
layout manager will automatically resize all of its components.
setPreferredSize(new Dimension(anImage.getWidth(null),
anImage.getHeight(null)));
So here is the code we can use to test:
import java.awt.*;Here is the result:
import java.awt.event.*;
import javax.swing.*;
// This application displays an image
public class ImagePanel extends JPanel {
private Image anImage;
public ImagePanel() {
anImage = Toolkit.getDefaultToolkit().createImage("altree.gif");
while ((anImage.getWidth(null) == -1) && (anImage.getHeight(null) == -1));
setPreferredSize(new Dimension(anImage.getWidth(null), anImage.getHeight(null)));
}
public void paintComponent(Graphics g) {
super.paintComponent(g);
g.drawImage(anImage, 0, 0, null);
}
public static void main(String args[]) {
JFrame frame = new JFrame("Image Display Test");
frame.add(new ImagePanel());
frame.setDefaultCloseOperation(JFrame.EXIT_ON_CLOSE);
frame.pack(); // Makes size according to panel's preference
frame.setVisible(true);
}
}
Note that aince we used the panel's paintComponent() method to draw the image, the image is drawn as a background and so any components we add to the panel will appear on top of the image. So you can see that it is quite easy to create a window as shown below simply by adding components to the panel as usual: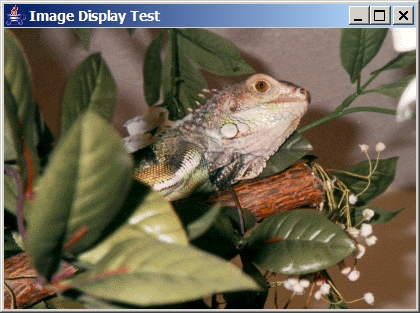
There are many more things that you can do with images: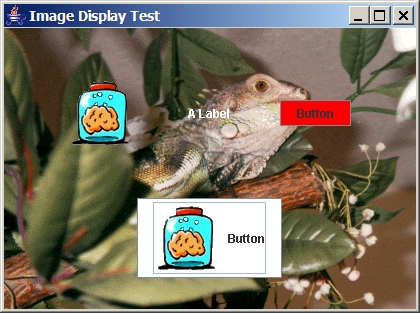
| 8.4 Creating a Simple Graph Editor |
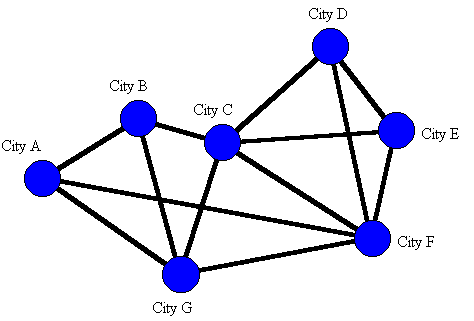
What is a graph ? There are many types of graphs. We are interested in graphs that form topological and/or spatial information. Our graphs will consist of nodes and edges. The nodes may represent cities in a map while the edges may represent roads between cities:
We would like to make a graph editor with the ability to:
We will begin our application as usual by developing the model. We know that our graph itself is going to be the model, but we must first think about what components make up the graph. These are the nodes and edges. We will first implement some basic node and edge classes.
Let us create a Node class. What state should each node maintain ? Well, it depends on the application that will be using it. Since we know that the graph will be displayed, each node will need to keep track of its location. Also, we may wish to label nodes (e.g., a city's name). Here is a basic model for the nodes:
import java.awt.Point;Notice that we don't have much in terms of behaviour ... simply some get/set methods and a toString() method. Notice the two different set methods for location. This gives us flexibility in cases where we the coordinates are either Point objects or ints.
public class Node {
private String label;
private Point location;public Node() { this("",new Point(0,0)); }
public Node(String aLabel) { this(aLabel, new Point(0,0)); }
public Node(Point aPoint) { this("", aPoint); }
public Node(String aLabel, Point aPoint) {
label = aLabel;
location = aPoint;
}public String getLabel() { return label; }
public Point getLocation() { return location; }public void setLabel(String newLabel) { label = newLabel; }
public void setLocation(Point aPoint) { location = aPoint; }
public void setLocation(int x, int y) { location = new Point(x, y); }// Nodes look like this: label(12,43)
public String toString() {
return(label + "(" + location.x + "," + location.y + ")");
}
}
What state do we need for a graph edge ? Well ... they must start at some node and end at another so we may want to know which nodes these are. Does it make sense for a graph edge to exist when one or both of its endpoints are not nodes ? Probably not. So an edge should keep track of the node from which it starts and the node at which it ends. We will call them startNode and endNode. What about a label ? Sure ... roads have names (as well as lengths). Here is a basic Edge class:
public class Edge {Now what about the graph itself ? What do we need for the state of the graph ?
private String label;
private Node startNode, endNode;public Edge(Node start, Node end) { this("", start, end); }
public Edge(String aLabel, Node start, Node end) {
label = aLabel;
startNode = start;
endNode = end;
}public String getLabel() { return label; }
public Node getStartNode() { return startNode; }
public Node getEndNode() { return endNode; }public void setLabel(String newLabel) { label = newLabel; }
public void setStartNode(Node aNode) { startNode = aNode; }
public void setEndNode(Node aNode) { endNode = aNode; }// Edges look like this: sNode(12,43) --> eNode(67,34)
public String toString() {
return(startNode.toString() + " --> " + endNode.toString());
}
}
Still, we have a few choices for representing the Graph:
Let us examine our Node and Edge classes a little further and try to imagine additional behaviour that we may want to have.
Notice that each edge keeps track of the nodes that it connects to. But shouldn't a node also keep track of the edges are connected to it ? Think of "real life". Wouldn't it be nice to know which roads lead "into" and "out of" a city ? Obviously, we can always consult the graph itself and check ALL edges to see if they connect to a given city. This is NOT what you would do if you had a map though. You don't find this information out by looking at ALL roads on a map. You find the city of interest, then look at the roads around that area (i.e., only the ones heading into/out of the city).
The point is ... for time efficiency reasons, we will probably want each node to keep track of the edges that it is connected to. Of course, we won't make copies of these edges, we will just keep "pointers" to them so the additional memory usage is not too bad.
We should go back and add the following instance variable to the Node class:
private ArrayList<Edge> incidentEdges;
We will also need the following get method and another for adding an edge:
public ArrayList<Edge> incidentEdges() { return incidentEdges; }
public void addIncidentEdge(Edge e) { incidentEdges.add(e);
}
We will also have to add this line to the last of the Node constructors:
incidentEdges = new ArrayList<Edge>();
While we are making changes to the Node class, we will also add another interesting method called neighbours that returns the nodes that are connected to the receiver node by a graph edge. That is, it will return an ArrayList of all nodes that share an edge with this receiver node. It is very much like asking: "which cities can I reach from this one if I travel on only one highway ?".
We can obtain these neighbours by iterating through the incidentEdges of the receiver and extracting the node at the other end of the edge. We will have to determine if this other node is the start or end node of the edge:
public ArrayList<Node> neighbours() {As we write this method, it seems that we are writing a portion of code that is potentially useful for other situations. That code is the code responsible for finding the opposite node of an edge. We should extract this code and make it a method for the Edge class:
ArrayList<Node> result = new ArrayList<Node>();
for (Edge e: incidentEdges) {
if (e.getStartNode() == this)
result.add(e.getEndNode());
else
result.add(e.getStartNode());
}
return result;
}
public Node otherEndFrom(Node aNode) {Now, we can rewrite the neighbours() method to use the otherEndFrom() method:
if (startNode == aNode)
return endNode;
else
return startNode;
}
public ArrayList<Node> neighbours() {Ok. Now we will look at the Graph class. We have decided that we were going to store just the nodes, and not the edges. We will also store a label for the graph ... after all ... provinces have names don't they ?
ArrayList<Node> result = new ArrayList<Node>();
for (Edge e: incidentEdges)
result.add(e.otherEndFrom(this));
return result;
}
import java.util.*;Let us write a method to return all the edges of the graph. It will have to go and collect all the Edge objects from the incident edges of the Node objects and return them as an ArrayList. Can you foresee a small problem ?
public class Graph {
private String label;
private ArrayList<Node> nodes;public Graph() { this("", new ArrayList<Node>()); }
public Graph(String aLabel) { this(aLabel, new ArrayList<Node>()); }
public Graph(String aLabel, ArrayList<Node> initialNodes) {
label = aLabel;
nodes = initialNodes;
}
public ArrayList<Node> getNodes() { return nodes; }
public String getLabel() { return label; }
public void setLabel(String newLabel) { label = newLabel; }// Graphs look like this: label(6 nodes, 15 edges)
public String toString() {
return(label + "(" + nodes.size() + " nodes, " +
getEdges().size() + " edges)");
}
}
// Get all the edges of the graph by asking the nodes for themNow we need methods for adding/removing nodes/edges. Adding a node or edge is easy, assuming that we already have the node or edge:
public ArrayList<Edge> getEdges() {
ArrayList<Edge> edges = new ArrayList<Edge>();
for (Node n: nodes) {
for (Edge e: n.incidentEdges()) {
if (!edges.contains(e)) //so that it is not added twice
edges.add(e);
}
}
return edges;
}
public void addNode(Node aNode) { nodes.add(aNode); }Wait a minute ! How do we add an edge if we do not store them explicitly ? Perhaps we don't want an addEdge method that takes an "already created" edge. Instead, we should have an addEdge method that takes the startNode and endNode as parameters, then it creates the edge:public void addEdge(Edge anEdge) {
// ?????? What ?????? ...
}
public void addEdge(Node start, Node end) {There ... that is better. What about removing/deleting a node or edge ? Deleting an Edge is easy, we just ask the edge's start and end nodes to remove the edge from their lists. Removing a Node is a little more involved since all of the incident edges must be removed as well. After all ... we cannot have edges dangling with one of its Nodes missing !
// First make the edge
Edge anEdge = new Edge(start, end);// Now tell the nodes about the edge
start.addIncidentEdge(anEdge);
end.addIncidentEdge(anEdge);
}
public void deleteEdge(Edge anEdge) {OK. Let us write some code that now tests the model classes. Here is static method for the Graph class that creates and returns a graph:
// Just ask the nodes to remove it
anEdge.getStartNode().incidentEdges().remove(anEdge);
anEdge.getEndNode().incidentEdges().remove(anEdge);
}public void deleteNode(Node aNode) {
// Remove the opposite node's incident edges
for (Edge e: aNode.incidentEdges())
e.otherEndFrom(aNode).incidentEdges().remove(e);
nodes.remove(aNode); // Remove the node now
}
public static Graph example() {We can test it by writing Graph.example() anywhere. This looks fine and peachy, but if we have 100 nodes, we would need 100 local variables (or a big array) just for the purpose of adding edges !! Maybe this would be a better way to write the code:
Graph myMap = new Graph("Ontario and Quebec");
Node ottawa, toronto, kingston, montreal;myMap.addNode(ottawa = new Node("Ottawa", new Point(250,100)));
myMap.addNode(toronto = new Node("Toronto", new Point(100,170)));
myMap.addNode(kingston = new Node("Kingston", new Point(180,110)));
myMap.addNode(montreal = new Node("Montreal", new Point(300,90)));
myMap.addEdge(ottawa, toronto);
myMap.addEdge(ottawa, montreal);
myMap.addEdge(ottawa, kingston);
myMap.addEdge(kingston, toronto);return myMap;
}
public static Graph example() {This way, we can access the nodes of the graph by their names (assuming that they are all unique names). How can we make this happen ? We just need to make another addEdge() method that takes two String arguments and finds the nodes that have those labels. Perhaps we could make a nice little helper method in the Graph class that will find a node with a given name (label):
Graph myMap = new Graph("Ontario and Quebec");myMap.addNode(new Node("Ottawa", new Point(250,100)));
myMap.addNode(new Node("Toronto", new Point(100,120)));
myMap.addNode(new Node("Kingston", new Point(200,130)));
myMap.addNode(new Node("Montreal", new Point(300,70)));
myMap.addEdge("Ottawa", "Toronto");
myMap.addEdge("Ottawa", "Montreal");
myMap.addEdge("Ottawa", "Kingston");
myMap.addEdge("Kingston", "Toronto");return myMap;
}
public Node nodeNamed(String aLabel) {Now we can write another addEdge() method that takes String parameters representing Node names:
for (Node n: nodes)
if (n.getLabel().equals(aLabel)) return n;
return null; // If we don't find one
}
public void addEdge(String startLabel, String endLabel) {Notice the way we share code by making use of the "already existing" addEdge() method. Also notice the careful checking for valid node labels. After this new addition, the 2nd main() method that we created above will now work.
Node start = nodeNamed(startLabel);
Node end = nodeNamed(endLabel);
if ((start != null) && (end != null))
addEdge(start, end);
}
If we are going to be displaying the graph, we need to think about how we want to draw it. Here is what we "may" want to see:
So where do we start ? Let us work on writing code that draws each of the graph components separately. We will start by writing methods for drawing Nodes and Edges, then use these to draw the Graph. We can pass around the Graphics object that corresponds to the "pen" that belongs to the panel.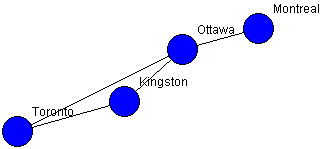
Here is a method for the Node class that will instruct a Node to draw itself using the given Graphics object:
public void draw(Graphics aPen) {Notice that we draw the node twice ... once for the blue color ... once for the black border.
int radius = 15;
// Draw a blue-filled circle around the center of the node
aPen.setColor(Color.blue);
aPen.fillOval(location.x - radius, location.y - radius, radius * 2, radius * 2);
// Draw a black border around the circle
aPen.setColor(Color.black);
aPen.drawOval(location.x - radius, location.y - radius, radius * 2, radius * 2);
// Draw a label at the top right corner of the node
aPen.drawString(label, location.x + radius, location.y - radius);
}
public void draw(Graphics aPen) {When drawing the graph, we should draw edges first, then draw the nodes on top. Why not the other way around ? Here is the corresponding draw method for the Graph class:
// Draw a black line from the center of he startNode to the center of the endNode
aPen.setColor(Color.black);
aPen.drawLine(startNode.getLocation().x, startNode.getLocation().y,
endNode.getLocation().x, endNode.getLocation().y);
}
public void draw(Graphics aPen) {
ArrayList<Edge> edges = getEdges();
for (Edge e: edges) // Draw the edges first
e.draw(aPen);
for (Node n: nodes) // Draw the nodes second
n.draw(aPen);
}
Now we can start the creation of our GraphEditor user interface. We will begin by making a panel on which we will display the graph:
import java.awt.*;
import java.awt.event.*;
import javax.swing.*;
public class GraphEditor extends JPanel {
private Graph aGraph; // The model (i.e. the graph)
public GraphEditor()
{ this(new Graph()); }
public GraphEditor(Graph
g) {
aGraph = g;
setBackground(Color.white);
}
// This is the method that
is responsible for displaying the graph
public void paintComponent(Graphics
aPen) {
super.paintComponent(aPen);
aGraph.draw(aPen);
}
}
Now we will make a class called GraphEditorFrame that represents a simple view which holds only our GraphEditor panel:
import javax.swing.*;
public class GraphEditorFrame extends JFrame
{
private GraphEditor editor;
public GraphEditorFrame
(String title) { this(title, new Graph()); }
public GraphEditorFrame
(String title, Graph g) {
super(title);
add(editor = new
GraphEditor(g));
setDefaultCloseOperation(EXIT_ON_CLOSE);
setSize(600, 400);
}
public static void main(String
args[]) {
new GraphEditorFrame("Graph Editor", Graph.example()).setVisible(true);
}
}
Notice that we can run the example by running the GraphEditorFrame class. Our example Ontario/Quebec graph comes up right away ! This is because the paintComponent() method of GraphEditor() class is called upon startup.
What kind of action should the user perform to add a node to the graph ? There are many possibilities (i.e., menu options, buttons, mouse clicks). We will allow nodes to be added to the graph via double clicks of the mouse. When the user double-clicks on the panel, a new node will be added at that click location. We must have the GraphEditor class implement the MouseListener interface. When we receive a click count of 2 on a mouseClick event, we will add the node at that location. For now, we will leave the other mouse listeners blank:
public void mouseClicked(MouseEvent event) {Of course, we will have to add the MouseListener in the constructor. We will do this by calling addEventHandlers() which we will be adding to later on:
// If this was a double-click, then add a node at the mouse location
if (event.getClickCount() == 2) {
aGraph.addNode(new Node(event.getPoint()));
// We have changed the model, so now we update
update();
}
}
public void mousePressed(MouseEvent event) { }
public void mouseReleased(MouseEvent event) { }
public void mouseEntered(MouseEvent event) { }
public void mouseExited(MouseEvent event) { }
public void addEventHandlers() {The update() method itself is quite simple since there is only one component on the window ! It merely calls repaint() after temporarily disabling the event handlers:
addMouseListener(this);
}
public void removeEventHandlers() {
removeMouseListener(this);
}
public void update() {If we run our code, we will notice something that is not so pleasant. Our strategy of using the double click allows us to add nodes on top of each other, making them possibly indistinguishable:
removeEventHandlers();
repaint();
addEventHandlers();
}
Perhaps instead of having nodes lying on top of each other, we could check to determine whether or not the user clicks within a node. Then we can decide to "not add" the node if there is already one there. What do we do then ... ignore the click ? Maybe we should cause the node to be somehow "selected" so that we can move it around. To do this, we will need to add functionality that allows nodes to be selected and unselected.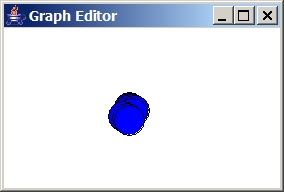
We can just check the distance from the given point to the center of all nodes. If the distance is <= the radius, then we are inside that node.
In fact, we are not really computing the distance, we are computing the square of the distance. This is more efficient since we do not need to compute the root.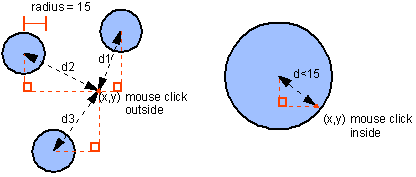
// Return the first node in which point p is contained, if none, return null
public Node nodeAt(Point p) {
for (Node n: nodes) {
Point c = n.getLocation();
int d = (p.x - c.x) * (p.x - c.x) + (p.y - c.y) * (p.y - c.y);
if (d <= (15*15)) return n;
}
return null;
}
The 15 looks like a "magic" number. It seems like this number may be used a lot. We should define a static constant in the Node class. Go back and change the draw method as well to use this new static value:
public static int RADIUS = 15;Here is the better code:
// Return the first node in which point p is contained, if none, return nullWe should go back into our drawing routines and adjust the code so that it uses this new RADIUS constant.
public Node nodeAt(Point p) {
for (Node n: nodes) {
Point c = n.getLocation();
d = (p.x - c.x) * (p.x - c.x) + (p.y - c.y) * (p.y - c.y);
if (d <= (Node.RADIUS * Node.RADIUS)) return n;
}
return null;
}
Now since we are allowing Nodes to be selected, we will have to somehow keep track of all the selected nodes. We have two choices:
private boolean selected;Now we should modify the draw method to allow nodes to be selected and unselected:public boolean isSelected() { return selected; }
public void setSelected(boolean state) { selected = state; }
public void toggleSelected() { selected = !selected; }
public void draw(Graphics aPen) {Of course, now to make it all work, we must use it in the mouseClicked event handler:// Draw a blue or red-filled circle around the center of the node
if (selected)
aPen.setColor(Color.red);
else
aPen.setColor(Color.blue);
aPen.fillOval(location.x-RADIUS, location.y-RADIUS, RADIUS*2, RADIUS*2);// Draw a black border around the circle
aPen.setColor(Color.black);
aPen.drawOval(location.x-RADIUS, location.y-RADIUS, RADIUS*2, RADIUS*2);// Draw a label at the top right corner of the node
aPen.drawString(label, location.x + radius, location.y - radius);}
public void mouseClicked(MouseEvent event) {Now how do we allow nodes to be deleted ? Perhaps, the user must select the node(s) first and then hit the delete key. Perhaps when the delete key is pressed, ALL of the currently selected nodes should be deleted. So we will make a method that first returns all the selected nodes. We will need to add this method to the Graph class which returns a vector of all the selected nodes:
// If this was a double-click, then add a node at the mouse location
if (event.getClickCount() == 2) {
Node aNode = aGraph.nodeAt(event.getPoint());
if (aNode == null)
aGraph.addNode(new Node(event.getPoint()));
else
aNode.toggleSelected();
// We have changed the model, so now we update
update();
}
}
// Get all the nodes that are selectedWe already took care of the node selection, now we must handle the delete key. We should have the GraphEditor implement the KeyListener interface.
public ArrayList<Node> selectedNodes() {
ArrayList<Node> selected = new ArrayList<Node>();
for (Node n: nodes)
if (n.isSelected()) selected.add(n);
return selected;
}
public void addEventHandlers() {
addMouseListener(this);
addKeyListener(this);
}
public void removeEventHandlers() {
removeMouseListener(this);
removeKeyListener(this);
}
public void keyTyped(KeyEvent event) {}There is a SLIGHT problem. It seems that even though we have only one component in our window (i.e., the JPanel which is the GraphEditor itself), this component does not have the focus by default. In order for the keystrokes to be detectable, the component MUST have the focus. So we will add the following line to the beginning of the update() method:
public void keyReleased(KeyEvent event) {}public void keyPressed(KeyEvent event) {
if (event.getKeyCode() == KeyEvent.VK_DELETE) {
for (Node n: aGraph.selectedNodes())
aGraph.deleteNode(n);
update();
}
}
public void update() {Now, how can we move nodes around once they are created ? Once again, we must decide how we want the interface to work. It is most natural to allow the user to move nodes by pressing the mouse down while on top of a node and holding it down while dragging the node to the new location, then release the mouse button to cause the node to appear in the new location. We will need the mousePressed and mouseDragged events of the MouseListener and MouseMotionListener interfaces, respectively. Here is what we will have to do:
requestFocus(); // Need this for handling KeyPress
removeEventHandlers();
repaint();
addEventHandlers();
}
private Node dragNode;Here are the mousePressed , mouseDragged and mouseReleased event handlers:
// Mouse press event handlerNotice that the pressing of the mouse merely stores the node to be moved. The releasing of the mouse button merely resets this stored node to null. All of the moving occurs in the dragging event handler. If we drag the mouse, we just make sure that we had first clicked on a node by examining the stored node just mentioned. If this stored node is not null, we then update its position and then update the rest of the graph.
public void mousePressed(MouseEvent event) {
// First check to see if we are about to drag a node
Node aNode = aGraph.nodeAt(event.getPoint());
if (aNode != null) {
// If we pressed on a node, store it
dragNode = aNode;
}
}// Mouse drag event handler
public void mouseDragged(MouseEvent event) {
if (dragNode != null)
dragNode.setLocation(event.getPoint());// We have changed the model, so now update
update();
}// Mouse release event handler (i.e. stop dragging process)
public void mouseReleased(MouseEvent event) {
dragNode = null;
}
Notice that all the edges connected to a node move along with the node
itself. Can you explain why ?
We have exhausted almost all the fun out of manipulating the graph nodes and we are now left with the "fun" of adding/deleting/selecting and moving edges. First we will consider adding edges. We must decide again on what action the user needs to perform in order to add the edge:
As it turns out, the mousePressed event handler already stores the "start" node in the dragNode variable. But now look at the mouseDragged event handler. Currently, if we press the mouse on a node and then drag it, this will end up causing the node to be moved. But we need to allow an elastic band edge to be drawn instead of moving the node. So, we now have two behaviours that we want to do from the same action of pressing the mouse on a node. This presents a conflict since we cannot do both behaviours. Let us modify our node-moving behaviour as follows:
But now during the mouseDragged event handler, we will have to make a decision so as to either move the node (if it was a selectedNode) or to merely draw an edge from the pressed node to the current mouse location. We cannot however, do the drawing within this method. Why ? Well, our paintComponent() method does the drawing and will draw over any of our drawing done here!! The drawing doesn't belong here. Drawing should happen in the paintComponent() method ONLY. All we will do here is just store the current mouse location in an elasticEndLocation variable and use it within the paintComponent() method. Here are the new changes:
// Mouse drag event handlerHere is the updated paintComponent() method for the GraphEditor class:
public void mouseDragged(MouseEvent event) {
if (dragNode != null) {
if (dragNode.isSelected())
dragNode.setLocation(event.getPoint());
else
elasticEndLocation = event.getPoint();
}
// We have changed the model, so now update
update();
}
// This is the method that is responsible for displaying the graphNotice that this method makes use of the dragNode and elasticEndLocation variables but still needs to decide whether or not to draw the elastic band line. We draw the elastic line ONLY if we are adding an edge. How do we know we are adding an edge ? Well, we must have pressed on a starting node, so the dragNode must not be null. Also, that dragNode must not be selected, otherwise we are in the middle of a "node moving" operation, not an "edge adding" one.
public void paintComponent(Graphics aPen) {
super.paintComponent(aPen);
aGraph.draw(aPen);
if (dragNode != null)
if (!dragNode.isSelected())
aPen.drawLine(dragNode.getLocation().x, dragNode.getLocation().y,
elasticEndLocation.x, elasticEndLocation.y);
}
Our last piece to this trilogy of event handler changes is to have the mouseReleased event handler add the new edge ONLY if we let go of the mouse button on top of a node that is not the same as the one we started with. If it is, or we let go somewhere off a node, then we must repaint everything either way to erase the elastic band:
// Mouse released event handler (i.e., stop dragging process)One of our last tasks is to allow edges to be selected and removed. We can similarly add an instance variable and methods to the edge class:
public void mouseReleased(MouseEvent event) {
// Check to see if we have let go on a node
Node aNode = aGraph.nodeAt(event.getPoint());
if ((aNode != null) && (aNode != dragNode))
aGraph.addEdge(dragNode, aNode);// Refresh the panel either way
dragNode = null;
update();
}
private boolean selected;Of course ... again we must initialize the instance variable in the constructor. Now we make selected edges appear different (i.e., red).public boolean isSelected() { return selected; }
public void setSelected(boolean state) { selected = state; }
public void toggleSelected() { selected = !selected; }
// Draw the edge using the given Graphics objectTo see if an edge has been selected, we will have to decide on where we should click. Perhaps near the midpoint of the edge. But how accurate must we be ? We should allow some tolerance. Maybe a tolerance roughly equivalent to the node's radius is acceptable.
public void draw(Graphics aPen) {
// Draw a black or red line from the center of the startNode to the center of the endNode
if (selected)
aPen.setColor(Color.red);
else
aPen.setColor(Color.black);
aPen.drawLine(startNode.getLocation().x, startNode.getLocation().y,
endNode.getLocation().x, endNode.getLocation().y);
}
Add the following method to the Graph class: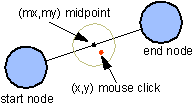
// Return the first edge in which point p is near the midpoint; if none, return nullNow, upon a double click, we must check for edges. We will first check to see if we clicked on a Node, then if we find that we did not click on a Node, we will check to see if we clicked on an Edge:
public Edge edgeAt(Point p) {
int midPointX, midPointY;for (Edge e: getEdges()) {
mX = (e.getStartNode().getLocation().x +
e.getEndNode().getLocation().x) / 2;
mY = (e.getStartNode().getLocation().y +
e.getEndNode().getLocation().y) / 2;
int distance = (p.x - mX) * (p.x - mX) +
(p.y - mY) * (p.y - mY);
if (distance <= (Node.RADIUS * Node.RADIUS))
return e;
}
return null;
}
public void mouseClicked(MouseEvent event) {We can change the keyPressed event handler to delete all selected Nodes AND Edges. Of course, we will need a method to get the selectedEdges first:
// If this was a double-click, then add/select a node or select an edge
if (event.getClickCount() == 2) {
Node aNode = aGraph.nodeAt(event.getPoint());
if (aNode == null) {
// We missed a node, now try for an edge midpoint
Edge anEdge = aGraph.edgeAt(event.getPoint());
if (anEdge == null)
aGraph.addNode(new Node(event.getPoint()));
else
anEdge.toggleSelected();
}
else
aNode.toggleSelected();// We have changed the model, so now we update
update();
}
}
// Get all the edges that are selected
public ArrayList<Edge> selectedEdges() {
ArrayList<Edge> selected = new ArrayList<Edge>();
for (Edge e: getEdges())
if (e.isSelected()) selected.add(e);
return selected;
}
public void keyPressed(KeyEvent event) {
if (event.getKeyCode() == KeyEvent.VK_DELETE) {
// First remove the selected edges
for (Edge e: aGraph.selectedEdges())
aGraph.deleteEdge(e);
// Now remove the selected nodes
for (Node n: aGraph.selectedNodes())
aGraph.deleteNode(n);
update();
}
}
| 8.5 Adding Features to the Graph Editor |
private Edge dragEdge;
private Point dragPoint;
public void mousePressed(MouseEvent event) {
// First check to see if we are about to drag a node
Node aNode = aGraph.nodeAt(event.getPoint());
if (aNode != null) {
// If we pressed on a node, store it
dragNode = aNode;
}
else
dragEdge = aGraph.edgeAt(event.getPoint());
dragPoint = event.getPoint();
}
public void mouseDragged(MouseEvent event) {
if (dragNode != null) {
if (dragNode.isSelected())
dragNode.setLocation(event.getPoint());
else
elasticEndLocation = event.getPoint();
}
if (dragEdge != null) {
if (dragEdge.isSelected()) {
dragEdge.getStartNode().getLocation().translate(
event.getPoint().x - dragPoint.x,
event.getPoint().y - dragPoint.y);
dragEdge.getEndNode().getLocation().translate(
event.getPoint().x - dragPoint.x,
event.getPoint().y - dragPoint.y);
dragPoint = event.getPoint();
}
}
// We have changed the model, so now update
update();
}
private Point dragPoint;
dragPoint = event.getPoint();
if (dragNode != null) {
if (dragNode.isSelected())
dragNode.setLocation(event.getPoint());
else
elasticEndLocation = event.getPoint();
}
to this:
if (dragNode != null) {
if (dragNode.isSelected()) {
for (Node n: aGraph.selectedNodes()) {
n.getLocation().translate(
event.getPoint().x - dragPoint.x,
event.getPoint().y - dragPoint.y);
}
dragPoint = event.getPoint();
}
else
elasticEndLocation = event.getPoint();
}
public static final int WIDTH = 7;
Loading and Saving Graphspublic void draw(Graphics aPen) {
if (selected) {
aPen.setColor(Color.RED);
int xDiff = Math.abs(startNode.getLocation().x - endNode.getLocation().x);
int yDiff = Math.abs(startNode.getLocation().y - endNode.getLocation().y);
for (int i= -WIDTH/2; i<=WIDTH/2; i++) {
if (yDiff > xDiff)
aPen.drawLine(startNode.getLocation().x+i, startNode.getLocation().y,
endNode.getLocation().x+i, endNode.getLocation().y);
else
aPen.drawLine(startNode.getLocation().x, startNode.getLocation().y+i,
endNode.getLocation().x, endNode.getLocation().y+i);
}
}
else {
aPen.setColor(Color.black);
aPen.drawLine(startNode.getLocation().x, startNode.getLocation().y,
endNode.getLocation().x, endNode.getLocation().y);
}
}
// Save the node to the given file. Note that the incident edges are not saved.
public void saveTo(PrintWriter aFile) {
aFile.println(label);
aFile.println(location.x);
aFile.println(location.y);
aFile.println(selected);
}
// Load a node from the given file. Note that the incident edges are not connected
public static Node loadFrom(BufferedReader aFile) throws IOException {
Node aNode = new Node();
aNode.setLabel(aFile.readLine());
aNode.setLocation(Integer.parseInt(aFile.readLine()),
Integer.parseInt(aFile.readLine()));
aNode.setSelected(Boolean.valueOf(aFile.readLine()).booleanValue());
return aNode;
}
// Save the edge to the given file. Note that the nodes themselves are not saved.
// We assume here that node locations are unique identifiers for the nodes.
public void saveTo(PrintWriter aFile) {
aFile.println(label);
aFile.println(startNode.getLocation().x);
aFile.println(startNode.getLocation().y);
aFile.println(endNode.getLocation().x);
aFile.println(endNode.getLocation().y);
aFile.println(selected);
}
// Load an edge from the given file. Note that the nodes themselves are not loaded.
// We are actually making temporary nodes here that do not correspond to the actual
// graph nodes that this edge connects. We'll have to throw out these TEMP nodes later
// and replace them with the actual graph nodes that connect to this edge.
public static Edge loadFrom(BufferedReader aFile) throws IOException {
Edge anEdge;
String aLabel = aFile.readLine();
Node start = new Node("TEMP");
Node end = new Node("TEMP");
start.setLocation(Integer.parseInt(aFile.readLine()),
Integer.parseInt(aFile.readLine()));
end.setLocation(Integer.parseInt(aFile.readLine()),
Integer.parseInt(aFile.readLine()));
anEdge = new Edge(aLabel, start, end);
anEdge.setSelected(Boolean.valueOf(aFile.readLine()).booleanValue());
return anEdge;
}
// Save the graph to the given file.
public void saveTo(PrintWriter aFile) {
aFile.println(label);
// Output the nodes
aFile.println(nodes.size());
for (Node n: nodes)
n.saveTo(aFile);
// Output the edges
ArrayList<Edge> edges = getEdges();
aFile.println(edges.size());
for (Edge e: edges)
e.saveTo(aFile);
}
// Load a Graph from the given file. After the nodes and edges are loaded,
// We'll have to go through and connect the nodes and edges properly.
public static Graph loadFrom(BufferedReader aFile) throws IOException {
// Read the label from the file and make the graph
Graph aGraph = new Graph(aFile.readLine());
// Get the nodes and edges
int numNodes = Integer.parseInt(aFile.readLine());
for (int i=0; i<numNodes; i++)
aGraph.addNode(Node.loadFrom(aFile));
// Now connect them with new edges
int numEdges = Integer.parseInt(aFile.readLine());
for (int i=0; i<numEdges; i++) {
Edge tempEdge = Edge.loadFrom(aFile);
Node start = aGraph.nodeAt(tempEdge.getStartNode().getLocation());
Node end = aGraph.nodeAt(tempEdge.getEndNode().getLocation());
aGraph.addEdge(start, end);
}
return aGraph;
}
public class GraphEditorFrame extends JFrame implements ActionListener
public Graph getGraph() { return aGraph; }
public void setGraph(Graph g) { aGraph = g; update(); }
JMenuBar menubar = new JMenuBar();
setJMenuBar(menubar);
JMenu file = new JMenu("File");
menubar.add(file);
JMenuItem load = new JMenuItem("Load");
JMenuItem save = new JMenuItem("Save");
file.add(load);
file.add(save);
load.addActionListener(this);
save.addActionListener(this);
public void actionPerformed(ActionEvent e) {Other Features:
JFileChooser chooser = new JFileChooser();
if (e.getActionCommand().equals("Load")) {
int returnVal = chooser.showOpenDialog(this);
if (returnVal == JFileChooser.APPROVE_OPTION) {
try {
editor.setGraph(Graph.loadFrom(new java.io.BufferedReader(
new java.io.FileReader(chooser.getSelectedFile().getAbsoluteFile()))));
}
catch (Exception ex) {
JOptionPane.showMessageDialog(null,
"Error Loading Graph From File !",
"Error",
JOptionPane.ERROR_MESSAGE);
}
}
}
else {
int returnVal = chooser.showSaveDialog(null);
if (returnVal == JFileChooser.APPROVE_OPTION) {
try {
editor.getGraph().saveTo(new java.io.PrintWriter(
new java.io.FileWriter(chooser.getSelectedFile().getAbsoluteFile())));
}
catch (java.io.IOException ex) {}
}
}
}